Do you want to send and receive emails from your Gmail address while using a third-party client like Microsoft Outlook or Mozilla Thunderbird? In that case, you need to know about SMTP (and IMAP and POP).
But what are they and how do they work? Read on to find out everything you need to know about Gmail’s SMTP settings.
What Is SMTP?
SMTP stands for Simple Mail Transfer Protocol. It’s a simple set of commands you can use to direct email transfers.
Protocols are networking-software rules that enable your computer to link with other networks across the globe.
You’ve likely heard of IP addresses – that stands for Internet Protocol, and is just one example of these kinds of protocols.
If you want to get technical, SMTP is part of the application layer that uses the TCP/IP protocol (TCP/IP stands for Transmission Control Protocol/Internet Protocol) to send email across networks like the Internet. It does this using a process known as “store and forward.” Using the Mail Transfer Agent, SMTP makes sure that your emails arrive at the right computer, in the right email inbox.
How Does SMTP Work?
To put it simply, when you send an email from an email client, it’s then forwarded onto the SMTP server. When it arrives at the SMTP server, it is then sentt to the recipient’s email server.
SMTP essentially takes different parts of your message and categorizes them. This allows the other server to understand the message in a two-way communication using a set of standards.
Check out our Gmail settings ultimate guide so your up to date on all of Gmail’s settings capabilities
What Is POP, and What Is IMAP?
SMTP is used for sending outgoing emails from your email clients. But how do you receive emails?
In order to receive incoming messages, you need to set up an incoming mail message to a server. To do this, you can use either POP or IMAP.
What Is POP?
POP stands for Post Office Protocol and is used to receive incoming emails. At the time of writing, the latest version of POP is POP3.
POP is most useful for use on your personal computer because it lets you download your emails anytime you want and even allows you to check your emails when you aren’t online.
Additional Reading: Gmail POP Settings
What Is IMAP?
IMAP stands for Internet Message Access Protocol. With IMAP, emails are automatically saved to a server. This means that you need to be online when you want to check your emails – although you can do this with any device with an internet connection.
Since IMAP is cloud-based, it’s often recommended over POP.
What’s the Difference Between SMTP, POP, and IMAP?
This can all get very confusing. So let’s revisit it and pop this (no pun intended) into one simple statement.
SMTP is the protocol that allows you to send outgoing emails, and IMAP and POP will enable you to receive incoming emails.
Let’s get into the nitty-gritty of how you set them up.
Quick SMTP Settings for Gmail
If you don’t need the long explanation, here are the settings that you need for using SMTP in Gmail.
SMTP Server Address: smtp.gmail.com
Use Authentication: yes
Secure Connection: Here, you will need the TLS/SSL based on your website plugin or your mail client
SMTP Username: All you need here is your Gmail account (yourname@gmail.com)
SMTP Password: Here, you will need your Gmail password
Gmail SMTP port: 465 (SSL) or 587 (TLS)
Why Would You Want to Set Up SMTP in Your Gmail account?
Before we start setting up SMTP in your Gmail, let’s take a look at some of the common reasons you might want to do this:
- You may want to set it up so that you can use Gmail as an external email client, if you use Thunderbird, for example.
- As a business, you may want to send emails directly from your website.
- The third most popular reason for setting up SMTP settings in Gmail is to be able to set up an SMTP plugin on your WordPress website.
Step by Step Instructions for Setting Up SMTP with Gmail
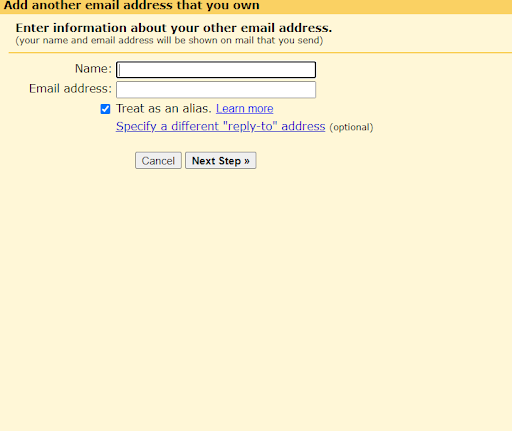
Step 1. Head over to your Gmail account. Select theCog icon, then See all settings and lastly, Accounts.
Step 2. Navigate to Send mail as: and then click on Add another email address. Please note that this may not work the first time; you may have to set up two-step verification at this point. Another reason this might not work is if your business is set up as a business account.

Step 3. You now need to add in your information.
Step 4. You should now see an option to Send emails through your SMTP.
Step 5. Fill in all the information – you can find these details below.
Step 6. After you have filled out the required information, you will get a confirmation from Gmail. Open up that email.
Step 7. Take the verification code and add it to the form that you still have open.
After you have connected your Google account, find the outgoing email message server option on your email client, then add these credentials.
Account settings required:
SMTP Outgoing Mail Server: smtp.gmail.com
Use Authentication: yes
Secure Connection: Here, you will need the TLS/SSL based your website plugin or your mail client
Gmail SMTP username: All you need here is your Gmail account (as in yourname@gmail.com)
Gmail SMTP Password: Here, you will need your Gmail password
Gmail SMTP port: 465 (SMTP SSL) or 587 (SMTP TLS)
There you go – you should now be set up and ready to send outgoing messages via SMTP.
Next let’s take a look at how you set up incoming messages via POP and IMAP.
Additional Reading: 10 Best Alternatives to Gmail
Setting up POP in Gmail
Step 1. Make sure you are logged into Gmail and choose Settings (it’s the cog icon).
Step 2. Once you are in Settings, look across the top ribbon and choose Forwarding and POP/IMAP.
![]()
![]()
Step 3. You should now be able to see the POP download section. It’s quite near the top of these options. Next, you need to choose either Enable POP for all mail OR Enable POP for mail that arrives from now on.

Step 4. You now need to save the changes. Make sure you scroll all the way down to the bottom of the page – it’s pretty easy to miss.
Step 5. Head over the email client that you want to use POP with and locate the POP/Incoming mail section. You’ll need to add in the following credentials.
Account settings required:
Incoming Mail Server (POP): pop.gmail.com
Requires SSL: yes
Port: 995
Server timeouts: Choose 5 minutes here
Display Name: Simply pop in your name here
Username: All you need here is your Gmail account (as in yourname@gmail.com)
Password: Here, you will need your Gmail password
Setting up IMAP in Gmail
Now let’s move on to how to set up IMAP in Gmail.
Step 1. As always, make sure you’re logged into your Google account.
Step 2. Find the Settings cog and click that. Then, choose Forwarding and POP/IMAP from the top navigation.
![]()
![]()
Step 3. Scroll down a little until you see the option for IMAP access.
Step 4. Choose the Enable IMAP radio button.
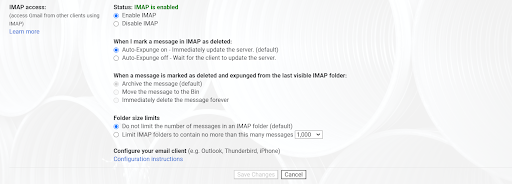
Step 5. Scroll down and click Save Changes – it’s hidden down the bottom of the page and is easy to miss.
All you need to do now is head over to your third-party email client and locate the Incoming mail message server/IMAP options, and enter these details:
Account settings required:
Incoming Mail Server (IMAP): imap.gmail.com
Requires SSL: Yes
Port: 993
Display Name: Just enter your name in this section
Username: Add in your Gmail account details here (yourname@gmail.com)
Password: Finally, add in your Gmail password
That’s it – you’re all done.
Setting up SMTP, POP, and/or IMAP can sound a little (or very) technical, but it essentially just helps you send and receive emails via a third-party email client or a website. In reality, it’s relatively simple to implement.
Benefits of Gmail SMTP Settings
There are various benefits to your organization of using Gmail’s SMTP settings. Here are some of the most powerful reasons you should set it up:
- Outsource – Allow different team members — even freelancers — to receive and send company emails. They can engage with prospects, follow up with existing customers, andr respond to form fill outs from your website in WordPress.
- Save time – Instead of jumping back and forth between Outlook, Thunderbird, Gmail, and WordPress, you can streamline your workflow. Manage everything from one email provider or even one account.
- Check when offline – There are times when you simply can’t get access to the web. Whether you’re traveling, out of cell tower range, or in a location without wifi, you can still write and respond to emails. Then, when you’re back online, the emails will be sent to the proper recipient.
Using Right Inbox to bring your email to the next level
Right Inbox is a comprehensive email tool with features that speed up your email and outreach workflow. It includes features that Gmail should have had all along, such as:
- Email Tracking – Right Inbox provides you crucial data on your email engagement via click-through tracking and link tracking. That way you can tweak your emails to get the best performance month over month.
- Recurring Emails – Have recurring emails that need to be sent weekly or monthly? Automate the entire process and only create them once.
- Templates – Thanks to tracking, you can see which emails are most effective. Then, turn these emails into templates to get better results quickly at scale.
- CRM Sync – No matter your favorite CRM tool, Right Inbox can integrate with it to send email threads to it. Then you can be alerted when it’s time for you to take over from the auto responses and close the deal.
- Custom Email Signatures – Create various signatures for each user. That way, you can simply plug and play no matter which team member is sending the email.
And much, much more!
Start using Right Inbox today to boost your team’s email productivity, and do everything you need right from within Gmail, all while saving money over competing software.
Gmail SMTP: Frequently Asked Questions
If you still have questions, that’s okay. Here are some of the frequently asked questions we get about Gmail SMTP servers:
What is my Gmail SMTP server address?
As we mentioned above, the Gmail outgoing SMTP server address is smtp.gmail.com. This is always the case, so you don’t need to search for a unique server address. Your username is simply your gmail email address.
Can I send email with the Gmail SMTP server?
Absolutely! Gmail SMTP is designed exactly for this purpose. You can use Outlook, Thunderbird, or other email clients — such as those provided by your hosting account — to send emails from the same email address in your associated gmail account.
How do I receive emails with SMTP?
The protocols for receiving emails are POP3 and IMAP. You will need to configure one of these two in order to receive emails from other servers. SMTP is only for outgoing emails.
Can I use Gmail SMTP if I have two-factor authentication (also known as two-step verification) set up?
Yes you can! But you will need to generate a special password for the app so that it will connect properly. Or more specifically, in WordPress’s case, you’ll need to use the Gmail API. Various plugins allow you to connect WordPress to Gmail this way without needing to type in the credentials manually.
Track emails, email reminders & templates in Gmail for free
Upgrade Gmail with the features it’s missing
Add to GmailDavid Campbell
David Campbell is the editor of the Right Inbox blog. He is passionate about email productivity and getting more done in less time.