Gmail email automation lets you automate routine email tasks. This can include things like automatically replying to common questions or scheduling emails to be sent later.
Here are seven ways to automate your email in Gmail. Some of these techniques can be executed using Gmail’s own features. In others, you’ll need to install Right Inbox’s Gmail extension to get the job done correctly.
- Automate Email Follow-Ups
- Create Gmail Templates For Fast responses
- Send Recurring Emails with Gmail
- Use Email Reminders to Never Miss Deadlines
- Automatically Move Emails to a Folder
- Automatically Forward Emails to Colleagues
- Use Filters to Hide All Promotional Emails
1. Automate Email Follow-Ups
Sending multiple emails in a sequence improves response rates from cold outreach.
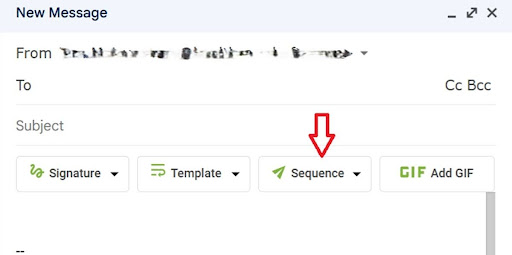
Step 1: You need to install Right Inbox to automate an email sequence in Gmail.
Step 2: Click the Sequence button that will appear at the top of your compose window after installing Right Inbox’s Chrome extension.
Step 3: Name your sequences in the next window and select “No reply to email” as the trigger.
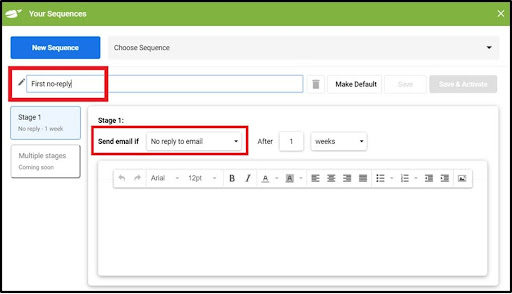
Step 4: Set when the follow-up email should be sent.
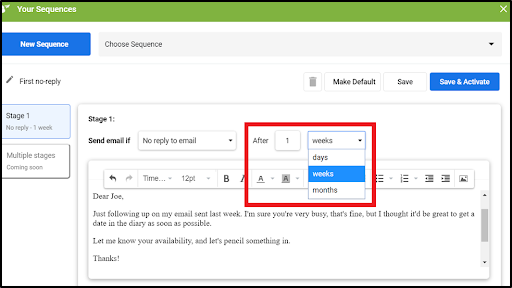
Step 5: Type your follow-up email in the compose window, then click the Save & Activate button at the top. That’s it.

Additional Reading: Ultimate Guide to Email Sequences
2. Create Gmail Templates for Fast Responses
Creating email templates in Gmail helps you respond to common queries faster. To create email templates:
Step 1: Install this Right Inbox Gmail Extension, and you should see several new options in your email compose window. One of those options is Template.
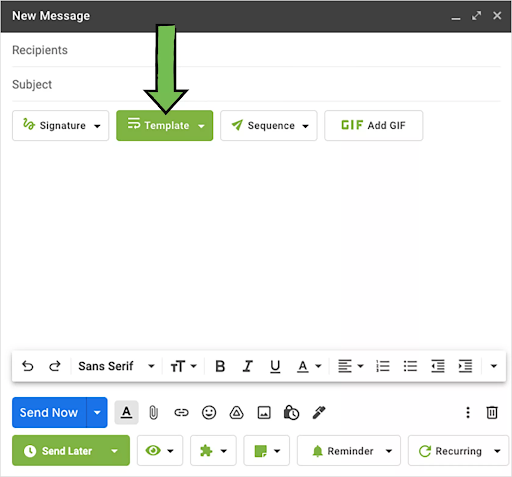
Step 2: Click that Templates option, rename it, and then add your first email template.
Step 3: Save the template, and then go ahead to create additional templates as needed.
This feature lets you populate your emails with your best-performing templates and adjust and personalize them accordingly.
Not only does this streamline your process, but it also makes you more consistent with your email communication. That’s a win-win situation.
3. Send Recurring Emails with Gmail
Automating the sending of recurring emails with Gmail saves you a lot of time while ensuring your recipients stay informed.
Step 1: Gmail has no native feature for sending recurring emails. So, start by installing the Right Inbox Gmail extension.
Step 2: Open Gmail and compose your email.
Step 3: Enter the To and Subject fields.
Step 4: Click the Recurring option at the bottom.

Step 5: In the next popup, customize the recurring details by setting how frequently you want to send the email, the day of the week, and the time. You can also select the timezone in case your recipients are in different locations.
Step 6: Click Schedule once you’ve completed all the fields.
4. Use Email Reminders to Never Miss Deadlines
An email reminder helps you stay on top of every conversation in your inbox.
Step 1: Open the email you’re interested in and click the snooze button at the top.
Step 2: Pick the date and time you want to receive the reminder.
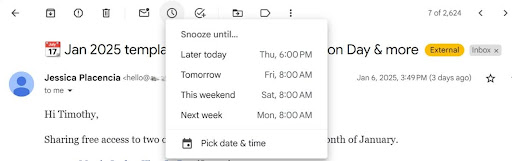
That’s it. You’ll receive a reminder on your chosen date.
5. Automatically Move Emails to a Folder
Automatically moving emails to a folder keeps your Gmail organized and free from inbox clutter.
Step 1. You need to be signed in to Gmail.
Step 2. Click the show search options gear to the right of the search box to open up the filters option
Step 3. Add the email address for the emails you want to send to a particular folder. Then click Create filter.
Step 4. Click apply label and then select the relevant label, like in this case, “Junk.” You can also create new labels from this menu. Click Create Filter once you’re done to save your settings.

Some Handy Gmail Labels Tips
Want to take your Gmail labeling to the next level? Here’s how:
- Color code your labels. There are many colors to choose from, and you can also add custom colors. Not only does this make your inbox a more beautiful place, but it also allows you to scan for labels based on their color.
- Don’t be afraid of sub-labels. The granular detail allows you to apply more context to your automatic labels. It makes for a more organized and productive email inbox.
- You can see up to 500 labels on the left navigation (although we would say that’s quite a lot!). If you have more than 500, then Gmail gets a little slower to load – and that’s not going to help your productivity.
Additional Reading: Gmail Labels: Everything You Need to Know
6. Automatically Forward Emails to Colleagues
Automatically forwarding emails to colleagues brings efficiency to your workflow and boosts your Gmail productivity significantly.
Step 1. Obviously, you need to be signed in to Gmail.
Step 2. Click the show search options gear to the right of the search box to open up the filters option.
Step 3. Add in the email address that you want to create a filter for. You can add multiple emails at once here. Then click Create filter.
Step 4. Click Add a forwarding address to add the relevant forwarding address and customize the settings as necessary. Click Save changes once you’re done.

Step 5. You will then get a little pop up to authorize. Click Proceed.
Step 6. This will send a confirmation code to that address. Click OK and go grab the code.
Step 7. Once you have verified, you will have set automatic forwarding of emails from the first email to the second.
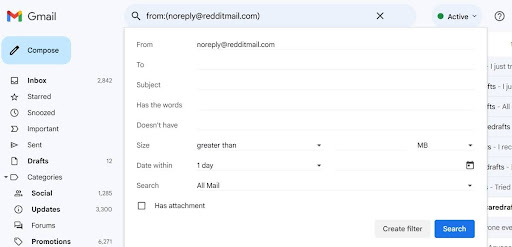
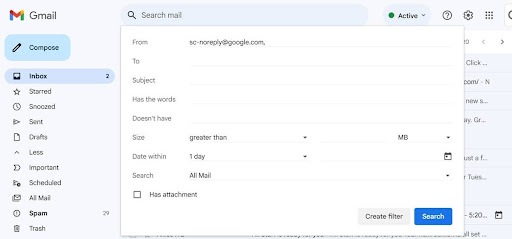
7. Use Filters to Hide Promotional Emails
Using filters to hide promotional emails helps keep your primary inbox clean and ensures that no important emails are missed.
Step 1. Sign in to Gmail.
Step 2. Click the show search options gear to the right of the search box to open the filter settings.
Step 3. Add in the email of the promotional email that you want to remove. Click Create filter. Note that you can choose to add multiple emails here
Step 4. Simply click Delete it and Create filter, and emails from the address you entered will never appear in your inbox again. Plus, you haven’t had to jump through the several hoops that some people add to their unsubscribe list. This method is much more productive.
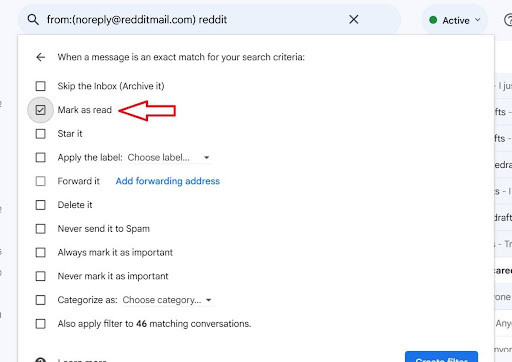
But what if you don’t want to delete all promotional emails? Perhaps there are some emails you may want to come back to later.
In that case, use the Mark as read option.
Alternatively, you can use the labels we discussed earlier to move the marketing messages to a specific folder.
If you want to be really organized, you can set up a new Gmail address specifically for promotional emails and forward them to that address based on the steps covered earlier in this article.
Some Handy Gmail Filter Tips
Need some quick extra tips? Here you go:
- Never be afraid to experiment. You can always delete filters if they don’t work out the way you want.
- Categories are your friend if you use the standard inbox. Categorizing different types of emails automatically pushes them to those tabs.
- Got important emails that Google keeps marking as spam? Use the Never send to spam feature.
Additional Reading: How to Create Filters in Gmail
With the amount of time that we spend in our email inboxes, finding ways to increase productivity is vital. Using these tips and Right Inbox to automate your emails as much as possible allows you to spend more doing and less time sorting.
Track emails, email reminders & templates in Gmail for free
Upgrade Gmail with the features it’s missing
Add to GmailDavid Campbell
David Campbell is the editor of the Right Inbox blog. He is passionate about email productivity and getting more done in less time.