If you’re looking for a comprehensive Google Docs guide, look no further. In this article, we’ll provide everything you need to know about the application, from creating new documents to collaborating with others. We’ll also cover some of the additional features that make Google Docs a powerful tool for working online.
Google Docs is one the most popular word processing apps. It’s free and web-based and allows you to do all the things a word processing app should do: create documents and edit text, add images, and so on.
Its unique feature is its ability to help teams collaborate. You can share documents with anyone, other people can add comments, chat within docs and much more. It also offers a large number of third-party add-ons.
What is Google Docs?
Google Docs, a web-based word processor that Google offers as part of its office suite–Google Drive – is free and available for use. It competes with Microsoft Office. Other services included in the cloud-based suite include Sheets (Excel), and Slides (Powerpoint).
Google Docs is accessible on all platforms and devices. All you need is an internet connection, a web browser, or, in the case mobile, the relevant apps. Google handles all the heavy lifting and does the rest while running the software in the cloud.
Docs is an online word processor that allows you to share and collaborate on the same document with multiple people, track revisions, changes and make suggestions in real-time.
How to Login to Google Docs
If you haven’t already logged in to your Google account when you visit the Google Docs page for the first time, you will need to create one.
If you don’t see an account that you want to use, click on Use another account. Register for a Google account if you don’t already have one.
After you sign in, you will see a Blank icon on the left sidebar of the top ribbon. To create a new document, click this link.
The 9 Best Formatting & Styling Options to Use
1. Formatting Text
You can modify the text and font style using the Google Docs toolbar. You can also assign specific font styles to certain sections of text. Google Docs also offers editing options such as paragraph spacing and alignment.
2. Table of contents
Click on your Google Docs to select the location where you would like the table of contents. Click Insert in the menu bar, and choose Table of contents.
You have the option to choose Between page numbers and blue links. If you wish to delete the table of contents click on the right-click menu and select Delete.
3. Inserting images and tables
Select Image from the Insert tab. Choose the following options: Upload, Take a snap, By URL, Your albums Google Drive, Search.
You must ensure that the file you choose is less than 50 MB in size and that it is one of the following formats: gif, jpg, or png.
4, How to Strikethrough in Google Docs
Sometimes you may need to draw a line through a text. This could be for a variety of reasons.
However, strikethrough is not an option in the ribbon.
Highlight the text you wish to strikethrough in Google Docs. From the toolbar, select Format. Then mouse-over TExt and choose Strikethrough.
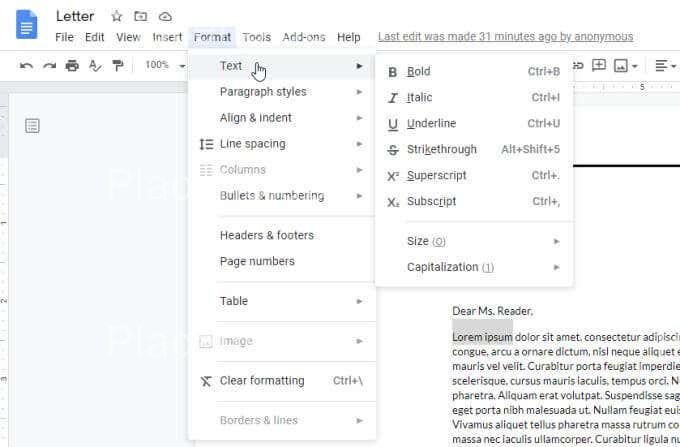
Now, you’ll see that the highlighted text has a line drawn through.
5. Using Subscript and Superscript
You may have noticed in the menu that you can choose to format your text as superscript or subscript.
This extra step is required to use these two features. To format a document with an exponent such as X to the power 2 in Excel, you will need to first highlight the 2 and type X2.
Select Format, then select Text, then select Superscript.
As you can see, the “2” has been formatted as an exponent (superscript).
If you want the 2 to be formatted at bottom (subscript), then choose Subscript from Format > Text.
It is easy to use, but requires some clicking in the menus to get it.
6. Change Margins in Google Docs
First, what if the margins of the template you have chosen don’t suit you? It’s easy to change the margins of a Google Docs document.
Select File and Page setup to access page margin settings
You can modify any of these formatting options in the Page setup window.
- You can set the document as Portrait, Landscape, or both.
- Design a background color to the page.
- Adjust the top, bottom, or right margins in inches.
When you’re done, click OK to apply the page formatting immediately.
7. Hanging Indent
Google Docs has a one-paragraph formatting option that many people struggle with. This is either the hanging indent or the first line. First-line indent refers to the area where the paragraph’s first line is intended.
Hanging indent refers to the area where the first line is not indented.
This is because if you select the first line or the entire paragraph, and then use the indent icon on the ribbon to indent the paragraph, it will do so.
To get a hanging indent or first-line in Google Docs:
- Pick the paragraph in which you want the hanging indent.
- Select the Format menu and choose Align & Indent. Then, select Indentation options.
- Change Special indent from Hanging to the Indentation options Window.
The default setting is 0. 5 inches.
This can be adjusted if desired, and then click Apply. This will apply your settings for the selected paragraph.
The example below shows a hanging indent.
8. How to Number Pages in Google Docs
Page numbering is the last formatting feature that can be difficult to use or understand. It’s another Google Docs feature that is hidden in the menu system.
To number your Google Docs pages, select Insert menu and choose Page numbers. This will open a small popup window that gives you simple options to format your page numbers.
These are the four options available:
- All pages should be numbered at the upper right.
- All pages should have a number at the lower left.
- Numbering at the upper right, starting on the second page.
- Numbering at the lower right, starting on the second page.
You can choose More options if you don’t like these options.
The next window will allow you to position exactly where page numbering should be.
- In the header oder footer.
- Whether to begin numbering on the first page.
- Which page should you start page numbering?
When you are done, click Apply to apply your page numbering choices.
9. Google Docs Word Count
Want to know how many words you have written so far? Select Tools and choose Word count. This will display the total pages, word count and character count.
Enable Display word count while you type and click OK, you will see the total word count of your document in the lower-left corner.
How to Enable Offline Editing
Google Docs has a bonus: you can edit, save, or create documents from your web browser even if you aren’t connected to the internet. This is a great option if you’re traveling and need to do some work.
All changes made are saved and will sync with your computer when you return online.
This is not an automatic feature. You will need to establish offline connections in your account.
To do this, go to the Google Docs homepage. Locate the menu button on your left-hand side.
Next, press Settings.
The pop-up box will appear on your screen. To enable offline editing, toggle the Offline switch to On.
(This should make the button blue and not gray. ).
The browser will automatically adjust to offline editing. You’ll then see the following icon if you edit your document without access to internet.
How to Download a Google Doc
You can download your document to a variety formats. To view all formats, select File and Download.
To get a copy of your document in Word, Google Doc to PDF, plain text, HTML and other formats, you can choose any of these options.
Pre-designed Google Docs Templates
Google Docs offers pre-designed templates that are professionally created to save you the hassle of creating a template. Although Google Docs templates are often underestimated by users, it is important to remember the high productivity potential that can be achieved by using these templates.
You can choose from a variety of templates that range from work to education to letters to resumes. This encourages the creation of well-designed documents. Google templates are great for creating and customizing your own templates.
Templates can be customized to replicate the same format across multiple documents. Custom templates allow you to create recurring documents easily, from task sheets to monthly expense sheet.
These templates can be made public or private by you.
How to Create Public Templates
Step 1 – Create an Google Docs document that you want to use as a template. You can also add modifications of your own.
Step 2 – Open Google Docs templates and click Submit a Template.
Step 3 – Select from your Google Docs and click Choose
Step 4 – Select your template that you created in step 1.
Step 5 – Type in a description of the template. It should not exceed one sentence or Google could reject it.
Step 6 – You will see a drop-down menu of Categories. Select the appropriate option. If you are creating a template for a project meeting, choose the category Business.
If the template is used to create a legal contract, then categorize it under Legal.
Step 7 – Choose the language in which the template was originally created.
Step 8 – Click Submit template.
Step 9 – Go back to the template gallery page, select your custom-made templates, and then start working.
How to create a Google Docs private template
Step 1 – After creating your template document.
Step 2 – Next, go to your Google Drive and click File.
Step 3 – Choose Make a copy.
Step 4 – Keep a copy of the original template document private.
Google Docs vs. Microsoft Word Comparison
How does Google Docs compare to Word?
Google Docs is available for free if you have a Google account. MS Word must be purchased with a Microsoft Office package. This includes other Microsoft products like Excel, PowerPoint, and Outlook.
The Home and Business packages start at $69. For an annual membership, the cost for the Home and Business packages ranges from $69.99 (for an individual at home user) to $150 (for an independent user at work user).
Google Docs allows you to collaborate with anyone, anywhere in the world, using Google Docs.
Google Docs is another distinguishing feature. All of your work is saved to Google Cloud. This means that you won’t lose the 20-page report even if your computer crashes.
(Whew!) MS Word lets you store your documents on your computer. Your coworkers cannot access them unless you save them and share them via email.
It doesn’t matter if you use Google Docs or MS Word. You can easily sync both. Simply upload an existing Word file to create a new Google Doc.
Sharing your Google Doc
Individuals can share documents with as many people and edit their permissions to limit what they are allowed to do.
To get started sharing, click File > Share.
There are four options for sharing — you can choose the one that suits your needs best.
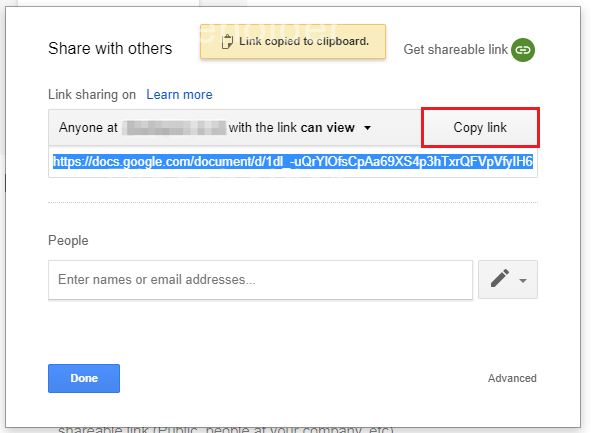
1. Make a Link that can be Shared.
A shareable link is the easiest way to share a Google Docs webpage. This allows anyone to view your document by clicking a unique URL.
After clicking Share, tap on the Get Shareable Link button at the top right.
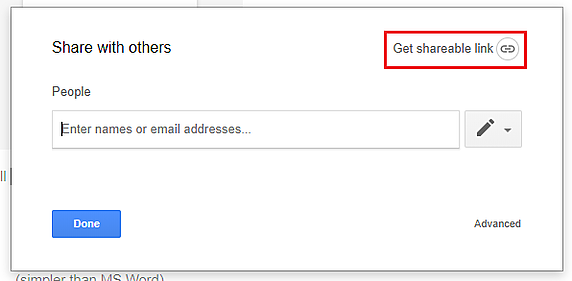
Select sharing permission to your document.
After you have defined permissions, click the Copy link.
The URL will then be copied to your clipboard for you to send to anyone who wishes to view the document.
2. Share via Email Address.
You can also share your document via email. This will send an email invitation to the person and add the document into their Google account.
For this, go back to the sharing box.
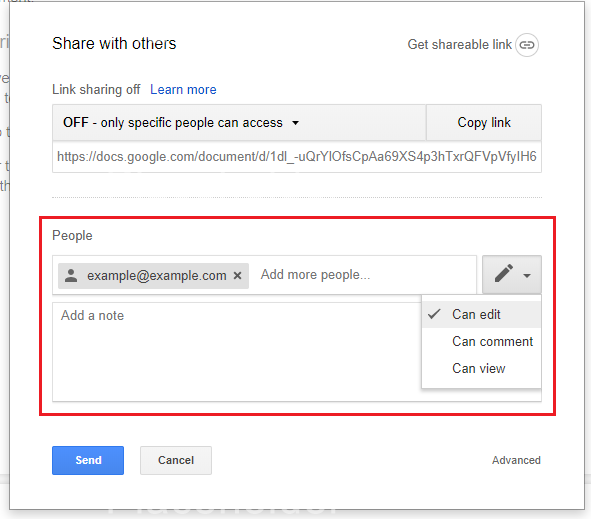
Enter the email address for the person you wish to share your document with, and then choose an option from the dropdown to edit their permissions.
You can add a note to the invitation and it will be displayed in your email invitation.
Additional Reading: How to Unshare a Google Doc
3. Select the Advanced Sharing Options
Go back to your sharing box, and click Advanced.
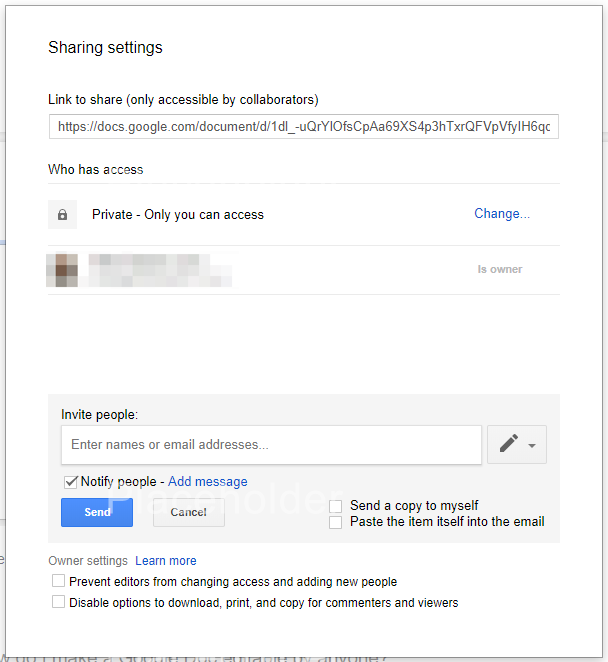
Here you can view all sharing settings including who has access to your document and their permission settings. You also have the option to invite or remove other people.
4. Allow Anyone to Edit your Document.
You want to give anyone the right to edit your document? To share your link, click File > Share

Click More in the drop-down menu.
Next, select On — Anyone with the Link and set the permissions using the drop-down menu at the bottom.
This option clearly states that anyone with your unique URL can edit, delete, or make changes to your document. Be careful who you share it with.
Conclusion
Congratulations! After going through the Google Docs Guide, you are now a Google Docs pro.
Google Docs allows you to share your work with anyone you choose, at any time, making it a great tool to collaborate. You can see why so many people are jumping on the Google Docs bandwagon with all these features.
Track emails, email reminders & templates in Gmail for free
Upgrade Gmail with the features it’s missing
Add to GmailDavid Campbell
David Campbell is the editor of the Right Inbox blog. He is passionate about email productivity and getting more done in less time.