Mail merges allows you to contact a large number of people with a customized personal message. Setting up a mail merge in Gmail allows you to scale your email outreach within the app.
Here are three ways to do a mail merge in Gmail.
1. Use a Simple Browser Extension (like Right Inbox)
The easiest way to merge emails in Gmail is with a browser extension.
Step 1: Install the Right Inbox browser extension. For the mail merge capabilities, you will need to have the paid plan. See pricing options here.
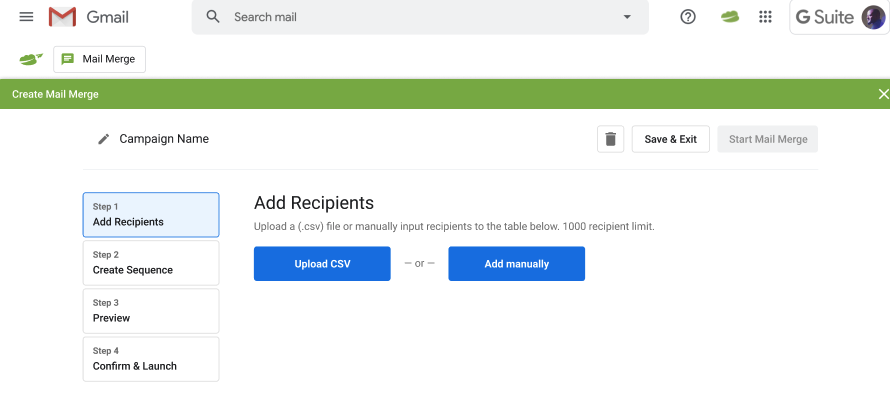
Step 2: Open Up your Gmail account and click on the mail merge button.
Step 3: Add your intended recipients to the mail merge. You can upload a CSV file or add the email addresses in manually.
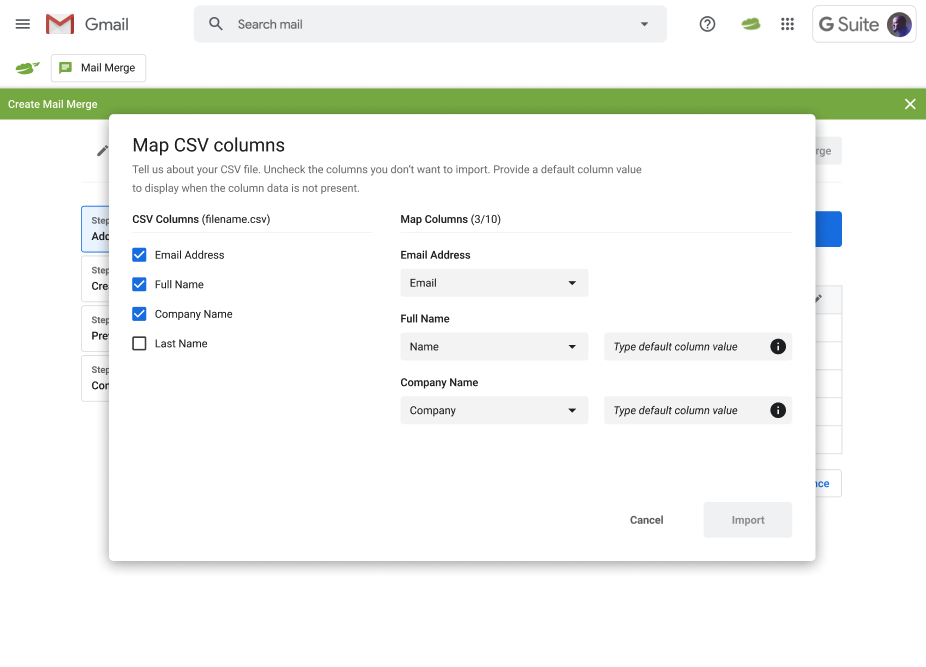
Step 4: (Optional): If you used a CSV file and uploaded your list now you must map the columns. Provide a default common value and uncheck the columns you don’t want to import.
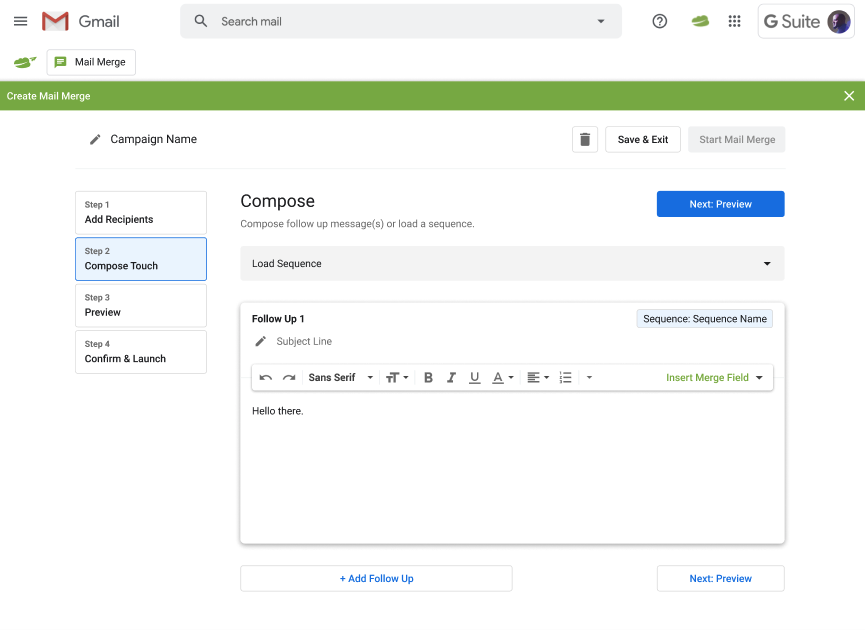
Step 5: Now it’s time to add your email copy for this mail merge. Activate your email follow ups for this campaign. Use your email templates here if you’ve tried and trusted copy.
Step 6: Preview the emails in the mail merge. You can also personalize each email individually if you’d like to.

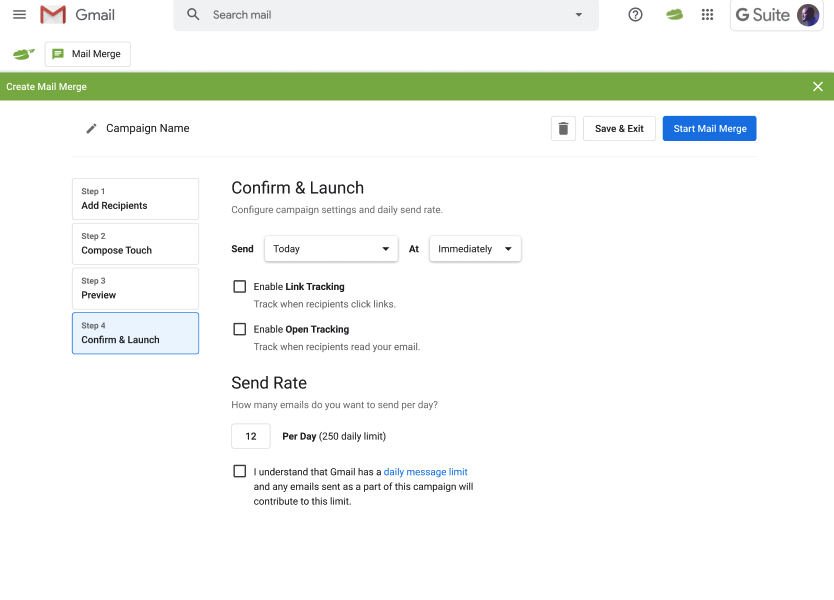
Step 7: Enable/ disable email tracking and the send rate for this campaign. Once you’ve confirmed your requirements you can start the mail merge.
And that’s it. Sit back and watch the replies come in!
Install Right Inbox from the chrome store today!
2. Create a Mail Merge Using Google Sheets and Gmail [Not as Straightforward as Right Inbox]
As mail merge isn’t a native feature to Gmail, you’ll have to use a workaround.This method, which uses Google Sheets and Gmail, is among the most popular.
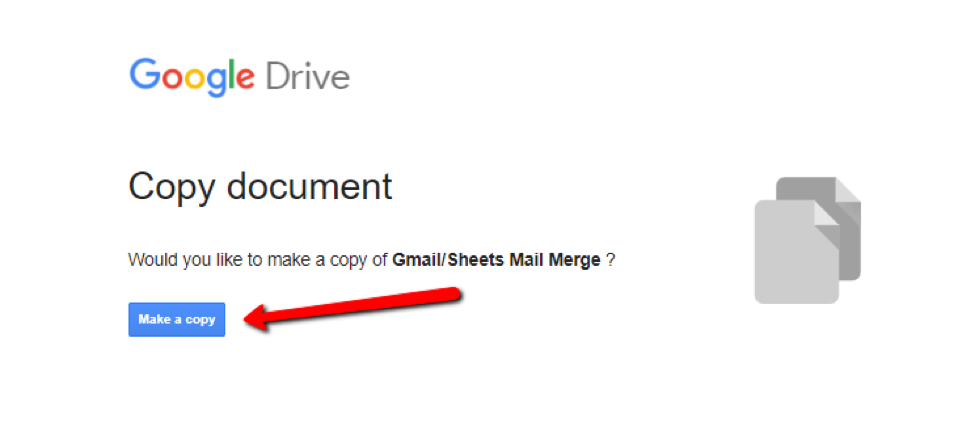
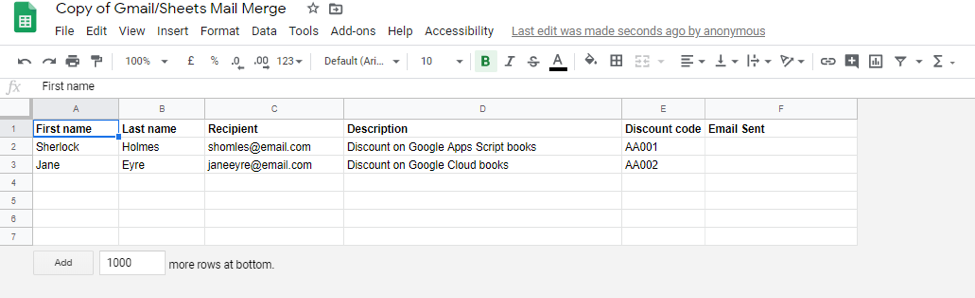
Step 1. Head over here and make a copy of the Gmail/Google Sheets Mail Merge spreadsheet template.
Step 2. Then, you’ll need to add the email addresses of your recipients into the column marked Recipient.
Step 3. Head over to your Gmail account and draft up the message you’d like to send. You can use placeholders like {{First Name}} for the fields that will be personalized – just make sure they correspond to the column names; otherwise this won’t work. This tells Gmail what data to pull into the message.
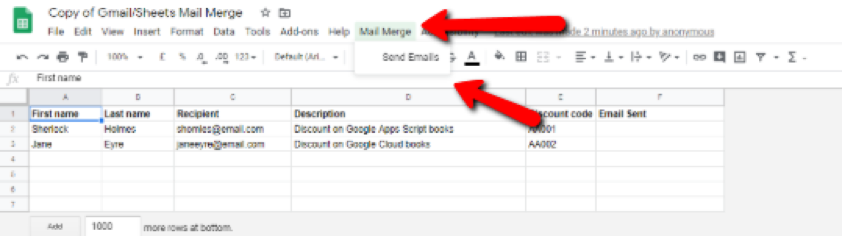
Step 4. When your email is drafted and the data is all filled in, select Mail Merge and then Send Emails.
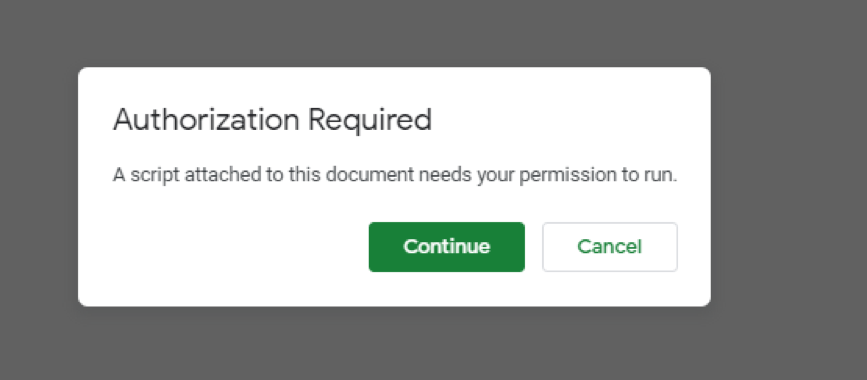
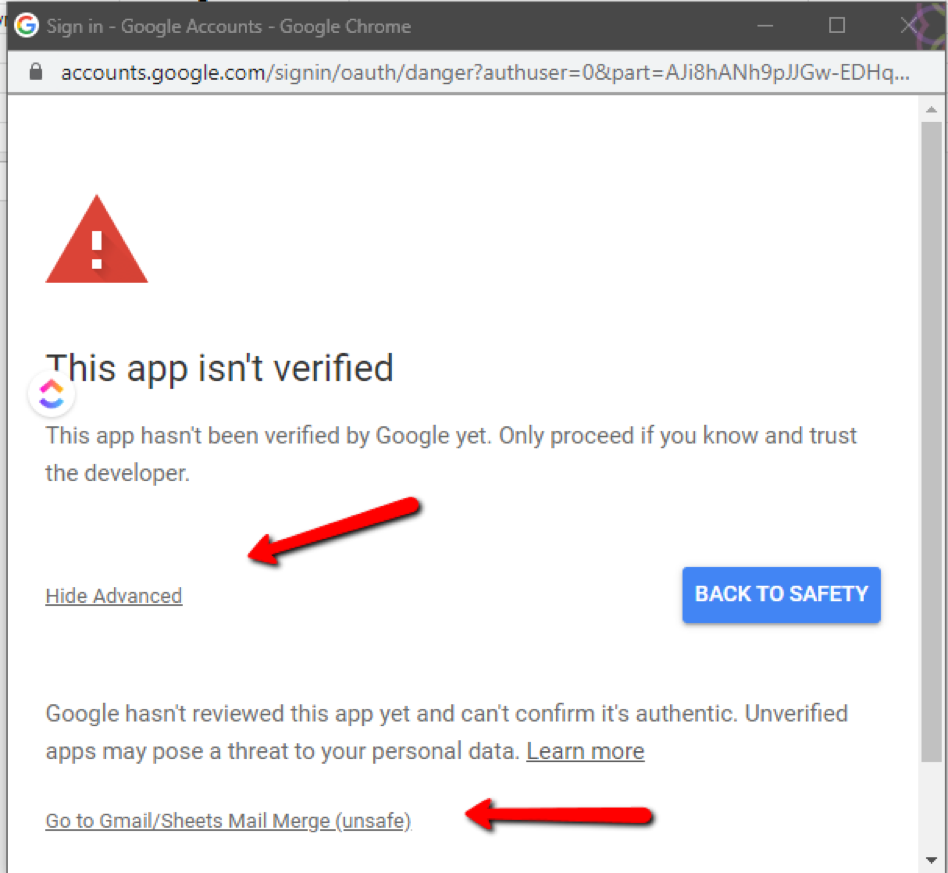
Step 5. You should now see a pop up telling you that the script requires authorization to run – click Continue. You may also need to confirm that you’re happy to proceed – don’t worry, it’s safe. Click Go to Gmail/Sheets Mail Merge
Step 6. Copy and paste your email message into the box that appears.
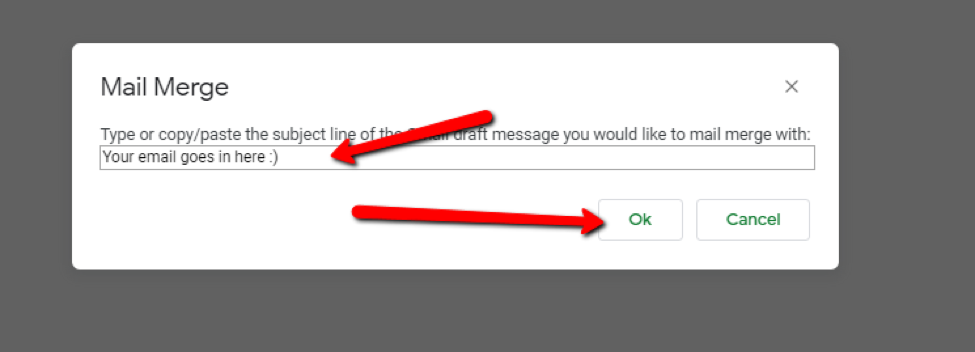
Step 7. Click OK.

Step 8. You should now see that the Email Sent column has updated to say that the emails have been sent.
Creating Additional Columns in the Google Sheet
Would you like to add more data to your emails? That’s pretty simple as well.
Step 1. Click on the next column to the right.
Step 2. Add in your text using the {{}} annotation – for example {{Address}}
Step 3. Try to make sure that you don’t change the Recipient or Email Sent columns – otherwise you’ll have to go into the Script Editor and update them.
Additional Reading: How to Create a Mail Merge with Google Sheets
3. Create A Mail Merge Using A Google Apps Script
If you’re a fan of diving deep into technology, even at the expense of simplicity and productivity, then you can use a script. Ultimately, the time/value payoff doesn’t seem to be as high as other options. But let’s address this option briefly:
- Grab the mail merge Google Sheet from Google’s developer site
- Put your contact information in there
- Make a Gmail draft, using the Google Sheet for mail merge fields
- Edit the code of your script if you need to add something like reply to, bcc, or cc
- Run the mail merge, providing permissions for the script
- Paste it in your subject line
- Send the mail merge
The 5 Best Gmail Mail Merge Tools to Use in 2025
Without further ado, let’s take a look at some of the most effective mail merge tools available. While there are dozens to choose from, we’ve decided to save you some time by boiling the list down the 5 best tools. After all, at the end of the day you need one, not twenty:
1. Right Inbox
Already a popular tool among smart entrepreneurs and businesses, Right Inbox is a comprehensive email marketing suite. It allows you to send reminders, save private notes, automate emails, and more.
Luckily, Right Inbox also offers a mail merge feature now. You can reach hundreds or thousands of people, all with custom messages using the template feature. It only takes about 5 minutes to set up. And perhaps the best part is that you can get started for free.
2. Mailshake
An inexpensive mail merge option, Mailshake also provides robust features and reliability — making it the top selection for our recommendations in this post. This B2B-focused tool is powerful enough to help growing businesses, and it is easy to use, so non-tech-savvy users can benefit from it.
You don’t need to log in directly to Gmail. Instead, just send all your mail merges from Mailshake. What’s more, the deliverability of Mailshake is unbeaten — so you can have confidence that your messages will be in your recipient’s inbox exactly at the right moment.
3. Mail Merge (Quicklution)
With Mail Merge from Quicklution, you can use mail merge with Slides, Sheets, Docs, and Forms within Google’s ecosystem.
As an add-on, you can compose all of your email’s within Quicklution. Its best advantage is having integration with all of Google’s primary tools. However, you don’t get to enjoy followup automation, A/B testing, or other advanced features.
4. YAMM (Yet Another Mail Merge)
YAMM is a Chrome extension. It is designed for Google Sheets. Unfortunately, you will need to switch between Gmail and YAMM while composing emails. However, you are enabled to send replies in the same thread of existing messages. Other than that, follow ups are not automated.
You can select from a number of different price points, depending on the features you need. Keep in mind that when relying on YAMM reports for analysis, they disappear after 10 days so you need to act fast. Still, the app provides features you don’t get out of stock Gmail functionality.
5. Mailmeteor
The method by which Mailmeteor mail merge tool works is by installing the extension in your Chrome browser. But note that it works solely inside of Google Sheets on the desktop. Luckily, you save a bit of time by not needing to open up Gmail directly.
Instead of going into Gmail and navigating the jungle of unread messages just to compose a new email, you can have Mailmeteor write your emails with its own built-in compose tool.
Another great feature of Mailmeteor is the preview tool, which is offered in addition to email throttling and automated scheduling. The tool helps you focus on the content and not the tech set-up of your communications.
Use Cases for Mail Merge
You can use mail merge any time you have to email a large number of people but want to keep your messages personalized. Here are a few use cases:
- Newsletters —Personalize newsletters for each subscriber, ensuring they feel valued and informed.
- Event invitations —Send tailored invitations to guests that address them by their names.
- Personalized marketing campaigns —Enhance customer engagement by including personalized offers or greetings in bulk emails.
- Customer surveys —Distribute surveys to gather feedback, addressing each recipient by name to boost response rates.
Common Mail Merge Pitfalls to Avoid
Before you send your first mail merge campaign, keep these common pitfalls in mind:
- Skipping records —Key records might be skipped due to data errors. Ensure your data source is correctly formatted and columns are named properly.
- Inaccurate personalization —Misconfigured fields can garble email content. Double-check that placeholders match data fields exactly.
- Spacing and punctuation issues —Extra spaces or missing punctuation make emails look unprofessional. Review previews carefully to catch and fix these issues.
- Invalid property error —Occurs when field names don’t match data. Ensure all field names in your template align with those in your data source.
- Mail merge generation stopped —This often occurs due to email limits. Check your tool’s settings to ensure you haven’t hit a sending cap.
Gmail Mail Merge Frequently Asked Questions (FAQs)
Here are some common questions that we get regarding mail merge:
What does mail merge do?
Starting with data from a spreadsheet or other data file, mail merge then inserts it into an email template. This allows you to customize emails at scale.
Does Google have built-in mail merge?
Gmail doesn’t have a built-in mail merge feature. You’ll have to use a third-party tool like Right Inbox to add mail merge capabilities to your Gmail account.
Can I send attachments with mail merge?
Yes, using apps like Right Inbox helps you send bulk emails with attachments and other media without being tech savvy.
What are the benefits of mail merge?
With mail merge, you can take a list of people and send them custom emails, signatures, attachments, and anything you want — achieving communication at scale without losing a personal touch or losing productivity.
Can I send a mail merge with Google Sheets or Google Docs?
When creating marketing or other scaled campaigns via email, it’s best to avoid wasting time by manually filling out spreadsheets as much as possible. At the very least, you should rely on some sort of automation to speed things along. Instead, Right Inbox can help you create templates, customized emails, and leverage mail merge with a few clicks.
Track emails, email reminders & templates in Gmail for free
Upgrade Gmail with the features it’s missing
Add to GmailDavid Campbell
David Campbell is the editor of the Right Inbox blog. He is passionate about email productivity and getting more done in less time.