
If you’re a Gmail user, then you have surely run into the problem of having more backed-up emails than you know what to do with. Sure, Inbox Zero is a great concept. But when it comes down to manually filing, archiving, or deleting those emails, it’s a different story.
When Gmail came out with Promotion, Social, and Primary tabs, it made it a bit easier to avoid inbox overwhelm. But it’s still easy to accrue thousands of emails before you know it — especially if you have those tabs turned off.
*** SUPERCHARGE Your Gmail account with this FREE chrome extension ***
So, in this post we’ll cover how to mass delete emails on Gmail quickly and easily. Without further ado, let’s get started:
Mass Deleting Emails on Gmail: Step by Step
Here’s how you can delete those pesky emails quickly:
Step 1. Log into your Gmail account with the excessive emails.
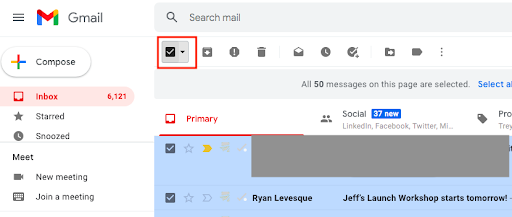
Step 2. Click the blank square at the top of your inbox, as seen below. This will select all of your emails on the screen. (It should be noted that by default, Gmail will display 50 emails at one time. If you have changed your settings, there may be more than 50 emails on one page).

Step 3. However, this doesn’t solve our problem just yet. We’ve only selected the first page of messages, and we’re looking to delete a lot more than that. Luckily, there’s an option for us. Click on the blue text that says “Select all XXX conversations in Primary” at the top.
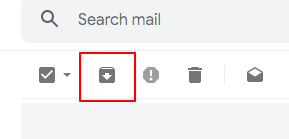
Step 4. After you click on that, you’re almost there. Now you just need to click the delete icon.

Alternatively, you can click Archive button to hide the emails out of sight, but prevent deleting them in case you want to access them later.
And that’s it! You’ve now mass deleted your Gmail emails.
How to Mass Delete Emails in Gmail by Date Range
Step 1. Log into your Gmail account where you wish to delete the emails
Step 2. Navigate to the search box at the top of Gmail, and use the search operators to define a “before” date, “after” date, or both (if you are looking for emails within a particular range).
![]()
![]()
For instance, to delete certain emails from the date range of January 15, 2023 to July 15, 2023, you would type the following into the search box: after:2023/1/15 before:2023/7/15.
Step 3. Click on the blank square at the top of the inbox, as seen below. This will mass-select up to 50 emails within your desired date range.
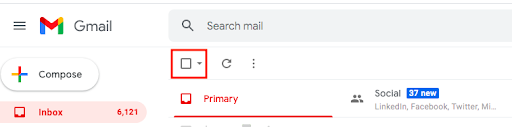
If you need to delete more than that, you need to perform step 4 below. If not, you can skip to step 5.
Step 4. If you have more than 50 emails you want to delete, you’ll need to take an extra step after clicking on the blank square. To delete every email within your desired date range, click on the blue text that says “Select all conversations that match this search.”

Step 5. Now, you just need to click on the delete icon.

Once you’ve done that, you’re all finished — every email within your specified date range will be deleted and sent to the trash, where they will reside for up to 30 days before being automatically deleted by Gmail.
How to Mass Delete Email in Gmail by Sender
Step 1. Log into your Gmail account with the emails you’d like to delete
Step 2. In the search box at the top of the inbox, you’ll need to use the “From:” search operator to specify the sender of the emails you want to delete.
For instance, if you want to delete all emails from Ryan@example.com, you would type “from: Rohn@example.com” into the search box, as seen below:

Step 3. Now, click on the white square at the top of the inbox, as displayed below.

Keep in mind that this will only select up to 50 emails that match your criteria. If you need to delete more emails, you’ll need to go to step 4 next. If you need to delete 50 emails or less, you can go straight to step 5.
Step 4. To delete every email this sender has ever sent you, click on “Select all conversations that match this search.”

Step 5. You’re on the final step. Simply click the “delete” icon, and all the messages from the desired sender will be deleted!
How To Delete Gmail Emails In Promotions
Step 1: Log into Gmail and go to the Promotions category.
Step 2: Click on the checkbox at the top left and click “Select All X Conversations in Promotions.

Step 3: Then click on the trash icon.
How To Delete All Unread Messages In Gmail
Step 1: Log into Gmail and type “:unread” in the search bar.
![]()
![]()
Step 2: Click the top left checkbox.
Step 3: Click “Select All Messages That Match This Search.”
Step 4: Click the trash icon.
How To Delete Emails By Size In Gmail
Step 1: Log into Gmail and in the search bar type “size: X.” You can type the amount of megabytes according to your preference. Then it’ll display all of the emails that match that size.
![]()
![]()
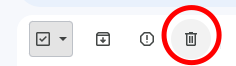
Step 2: Click on the top left checkbox.
Step 3: Click the trash button.
Important Considerations
There are a few extra things to keep in mind when it comes to deleting your Gmail emails:
Deleted Emails Aren’t Truly Deleted – When you delete emails, they don’t disappear from your Gmail completely — at least not right away. They will sit in your trash folder for up to 30 days until Gmail automatically deletes them. If you’re fine with that, there’s nothing more to do. But if you have sensitive information in your emails, you wish to go to Trash and manually delete them for good before that point.
Scan Your Emails First – You’ll want to browse through your old emails, at least briefly, before deleting them. You might accidentally delete some important messages if not.
Mass Delete Email on Gmail: Frequently Asked Questions (FAQs)
Is it possible to mass delete emails in Gmail?
Yes, but it is not an automatic process. And while you can’t delete all of your emails at once, there is a way to delete them en masse. Read the section above titled “Mass Deleting Emails on Gmail: Step by Step” for easy, precise instructions.
Can I recover emails that I’ve already deleted in Gmail?
Yes and no. It depends on if you’ve permanently deleted the email or simply sent it to the trash folder. When you first “delete” an email in Gmail, it will stay in the trash for up to 30 days, where you can actually recover it.
However, if you wait longer than a month, or if you manually delete the mail permanently from the trash, then it is gone forever.
Does archiving emails delete them in Gmail?
No, archiving a Gmail thread or message does not delete it. In fact, it simply sends the email to the archived folder so that it is out of sight and out of mind.
You should consider archiving important emails that you may want to revisit later, but don’t need to see right now. And with the Right Inbox extension, you can set yourself a reminder to revisit the email at exactly the right time without needing to remember a thing.
I have an email that I want to reuse as a template, but I deleted it in Gmail. Is it possible to undelete it?
It depends. Once you delete an email, Gmail stores it in the trash folder at first for up to 30 days before automatically deleting it permanently. If you recently deleted the email within the last 30 days, then check your trash folder and you could get lucky.
If Gmail already permanently deleted the email, or if you did so yourself, then the best thing to do is to prevent it from happening again. Use a Gmail extension like Right Inbox to create email templates out of your favorite emails. Then, it doesn’t matter if an email gets deleted — you will always have your template available within a few clicks.
Wrapping Up
Email is an important part of our daily lives. From bank statements to client communications, to marketing promotions, our inboxes are filling up faster than before.
If you’re like most people, it’s more time-efficient to simply bulk delete your emails at one time instead of worrying about them every day. So, if you follow the step-by-step instructions above, you can soon enjoy a clear and organized Gmail inbox once again — letting you get more done with less stress.
Track emails, email reminders & templates in Gmail for free
Upgrade Gmail with the features it’s missing
Add to GmailDavid Campbell
David Campbell is the editor of the Right Inbox blog. He is passionate about email productivity and getting more done in less time.