Google Sheets are automatically saved onto your Google Drive, so it’s easy to assume that they’re backed-up and secure in the Cloud. But for important data, it’s recommended that you add an extra layer of security to your important spreadsheets.
After all, if someone gained access to your phone or computer, it wouldn’t be hard for them to gain access to your Google Drive.
So, while Google doesn’t yet let you password-protect your Sheets, here’s a guide to how you can encrypt and decrypt your data, keeping your info safe from cybercriminals.
*** SUPERCHARGE Your Gmail account with this FREE chrome extension ***
How to Password Protect Your Google Sheet
If you’re setting up a password protect for the first time, you have to set up your password first. Unfortunately, Google won’t let you password protect your Sheets. However, you can encrypt your Sheet using third party tools.
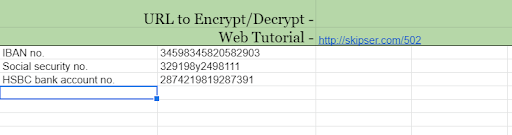
One such example is Skipser, which will encrypt your data in a document and secure it with a password.
Step 1. Open skipser.com.
Step 2. Download this ProtectedSheet template and enter your data in it from the third row.
Step 3. Go to Tools and select Script Editor which will open in a new window.
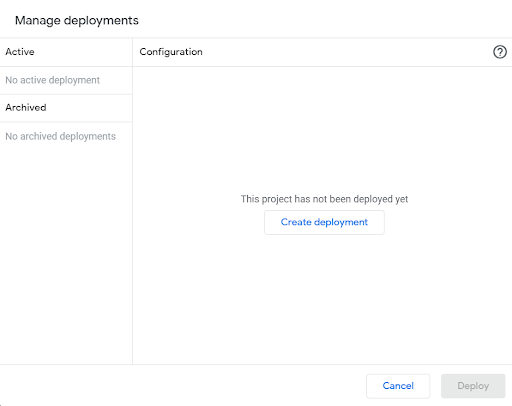
Step 4. From here, click the drop down menu next to Deploy, and select Manage deployments.
Step 5. In Configuration click Create deployment and click Deploy.
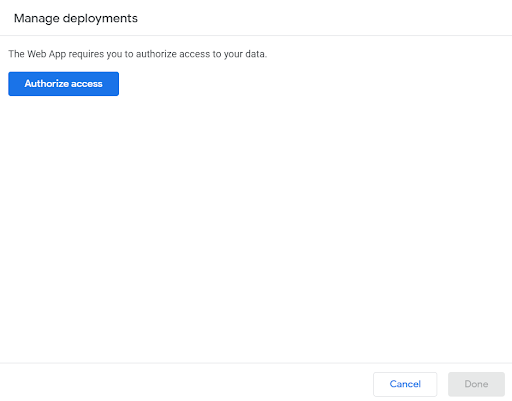
Step 6. Authorize access and click Done.
How to Encrypt Data in Google Sheets
Step 1. Go back into your Sheet.
Step 2. Go to the top navigation and click Protect File.
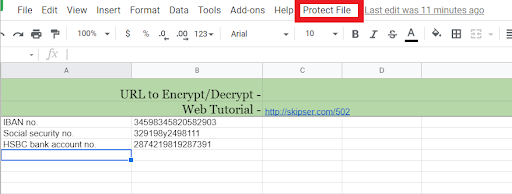
Step 3. From the drop-down, select Encrypt file.
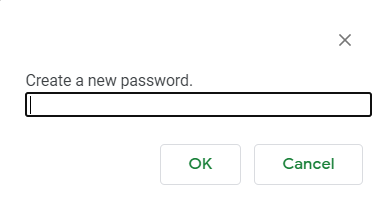
Step 4. In the pop-up that appears, enter a new password and click OK.
How to Open and Decrypt Protected Sheet
Step 1. Go into the Sheet.
Step 2. Click on Protect file in the top navigation.
Step 3. Select Decrypt File.
Step 4. In the pop-up window that appears, enter your password.
Step 5. You will now be able to see your data.
Step 6. When you’re finished, go back into the Protect File option and encrypt your Sheet again.
How to Change Your Password
Step 1. Go back into your Sheet and click Protect file from the top navigation.
Step 2. Select Change Password from the menu.
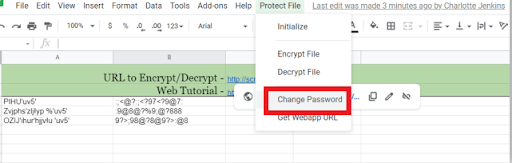
Step 3. Enter your new password and click Submit.
Additional Reading: Gmail/Workspace (previously G-Suite) Update History
How to Access Protected Sheets on Your Phone
It’s currently not possible to select the Protect File option from the mobile version of Google Sheets.
Instead, the encrypted URL of your sheet will be found in the first row of your sheet.
Step 1. Open the sheet on your phone.
Step 2. Click on the encrypt/decrypt URL on the first row of your sheet.
Step 3. You will now need to enter your password.
Additional Reading: How to Chat on Google Docs
4 Additional Strategies To Protect Your Google Sheets
1. Editing Warnings Or Editing Limitations
In Google Sheets, you can decide who is allowed to edit a particular sheet or range of cells in the sheet itself. You can also prompt warnings to users as a soft prevention method to keep people from editing it.
To do this:
Step 1. Go to the Data tab at the top of your sheet and then Protect sheets and ranges.
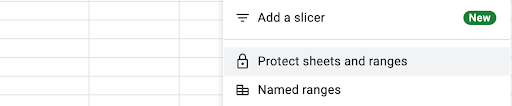
Step 2. Click on Add a sheet or range.
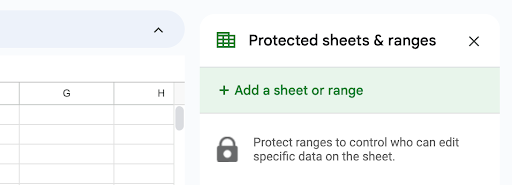
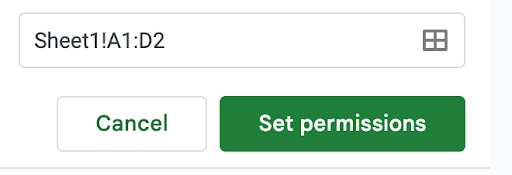
Step 3. You can highlight the range you want to protect with your mouse or type it in manually.
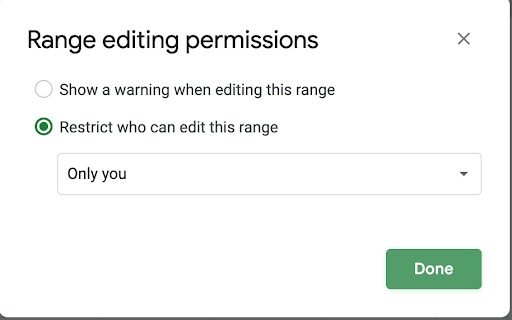
Step 4. Then click set permissions.
Step 5. Decide whether you want to restrict who can edit it or whether you want to simply add a warning. For instance, you can determine that only you or a few members of the team are allowed to edit the sheet. Then click Done.
Step 6. If you’d like to remove this protection or warning, go back to the protected sheets and ranges sidebar menu. Then click the trash icon next to the protected sheet or range that you no longer want to protect.
2. Excel File Protection
You can also protect your Google Sheet via a third-party method by turning it into an Excel file. Excel offers encryption built in for an easy protection method.
Step 1. Navigate to your sheet and download it as XLSX format. You can do this by clicking on File, then Download, then Microsoft Excel.

Step 2. From here open the file in Microsoft Excel on your computer. Go to File > Info > Protect Workbook, and click on Encrypt with Password.
Step 3. Select your password and click Ok.
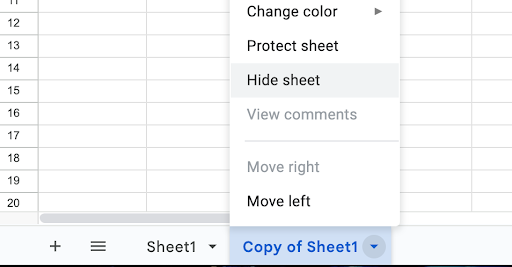
3. Hide a Sheet
You can hide sheets at the bottom of your Sheets screen by clicking on the sheet you want to hide and clicking on Hide Sheet.
In order to unhide the sheet, you can go into the View menu later if you determine that you want it to be publicly viewable again.
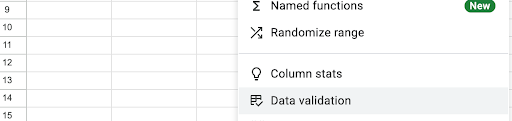
4. Data Validation
The last alternative method to protecting your Google Sheets is to use data validation. This means that if someone makes a change that does not fit the preset value or criteria, then the cell will not be able to be edited.
For instance, you may want to ensure that a particular cell or range only has dates, numbers, or text. In order to initiate data validation:
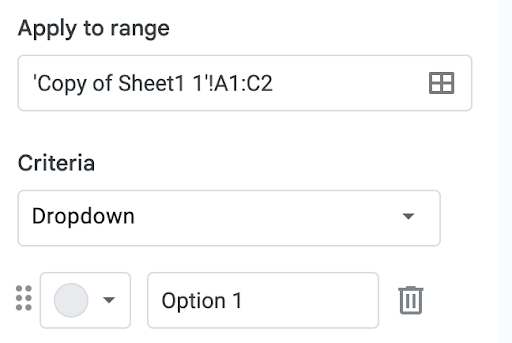
Step 1. Highlight the cell or range that you want. Then at the Data tab on the top, click Data Validation.
Step 2. Determine your criteria that the cell must meet if it’s going to be edited. You can also decide if you want to reject improper input or simply show a warning. Then click Done.
Leveling Up Your Gmail Account
Now that you know how to password protect a Google Sheet it’s time to take control of your inbox again. Want to cut your time spent in your Gmail by 50% or reach the elusive inbox zero? That’s where Right Inbox can help.
Right Inbox saves you time on repetitive tasks and helps you to send better emails, in less time consistently. Set up email templates in Gmail, see who opens and reads your emails or set up email reminders. With 11 features in total, Right Inbox is a must use extension for any power Gmail users. Try for free today!
In Summary
Google Sheets is where we store some of our most valuable numbers – our bank details, social security numbers, passwords, and access codes. Yet we often rely on our one Google Password to keep all our documents safe.
By spending just a few moments encrypting our Sheets, we can rest assured that our valuable information is kept secure.
Track emails, email reminders & templates in Gmail for free
Upgrade Gmail with the features it’s missing
Add to GmailDavid Campbell
David Campbell is the editor of the Right Inbox blog. He is passionate about email productivity and getting more done in less time.