What Are Gmail Filters?
Gmail Filters are a set of rules that allow you to automatically redirect emails as they enter your Gmail inbox.
With so many emails landing in your inbox every single day, you can see how this might save you a hefty chunk of time.
We all receive unwanted emails from sites or businesses that we don’t remember signing up to. Rather than block the sender, you can simply send them to the trash automatically.
Or maybe you’re subscribed to a bunch of marketing emails, but you like to read them on a particular day. Well, they can be automatically sent to a specific folder, and you can check them out at your leisure.
In addition, you can apply different colors to your filters so that you can quickly recognize certain types of email. You can also add importance markers and much more.
Gmail Filters are a very powerful way to free up time and become more productive.
So how do you go about creating them?
Create a Gmail Filter Using the Gmail Search Bar
Step 1. Head to the search bar at the top of the Gmail interface and type in an email address that you would like to create a filter for. Alternatively, you could search for a particular keyword to create a topic-specific folder.
Step 2. Click the little arrow on the right to refine your filter even more.

Step 3. In the new menu, you can refine by email address (to and from), subject, keyword, and much more.

Step 4. When you’ve refined your filter, click the Create Filter button at the bottom.
Step 5. This will take you to another menu as you can see in the image below (and we’ll touch on the different options later in this guide).

Step 6. To get started, select Categorize as, choose a category, and select Also apply filter to matching conversations. This will create a filter to categorize every single email into that filter, including past conversations.
Step 7. Click Create filter to confirm.
Create a Gmail Filter Using the Settings Menu
Step 1. Head over to Settings on the top right-hand side of the Gmail interface.
Step 2. On the Settings screen, click the Filters and blocked addresses tab.
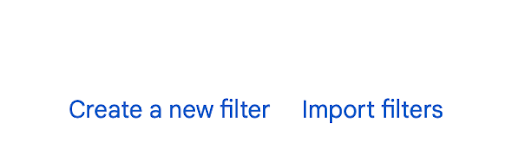
Step 3. Here, you can see all the filters you have created. To create a new filter, click on Create a new filter below your current filters.

Step 4. This will then open up the menu from Step 3 in the last section of this article.
Step 5. Repeat steps 3 to 6 from the last section.
What Actions Can Be Performed with Gmail Filters?
The following are the actions you can apply to filters, and they can also be combined to create even more specific criteria. Play around with the different options to see how you can make your email inbox work for you.
- Never send it to Spam
- Apply a label
- Delete it
- Skip the inbox
- Mark as read
- Forward it to
- Always mark it as important
- Star it
- Categorize as
- Never mark it as important
If you find something isn’t working, you can always edit or delete your filters.
Editing and Deleting Your Gmail Filters
Editing Gmail Filters
Step 1. Head to the Settings menu.
Step 2. On the Settings screen, click the Filters and blocked addresses tab.
Step 3. You should now see your current filters, as well as Edit and Delete options to the right-hand side. Click Edit next to the filter you’d like to modify.

Step 4. The new menu will allow you to edit the current filter as you wish. Once you have edited the first section, click Continue.
Step 5. When you’re prompted with the next set of options, adjust them, and click Update filter.
Deleting Gmail Filters
Step 1. Head to the Settings menu.
Step 2. On the Settings screen, click the Filters and blocked addresses tab.
Step 3. You should now see your current filters, as well as Edit and Delete options to the right-hand side. Click Delete next to the filter you’d like to remove.
Bonus Gmail Filter Tips
Let’s take a look two advanced things you can do with Gmail filters:
1. Import / Export Gmail Filters
So let’s say you’ve set up your filters just how you like them on your main Gmail account. But what about using those same filters on other accounts — do you need to start from scratch?
Luckily, you can actually export filters from a Gmail account and import them to another one easily!
To arrive at the export option, follow the steps we covered above heading to the gear icon, then settings, then Filters and Blocked Addresses again.
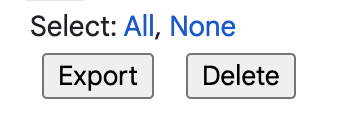
Now, simply click the checkbox beside the filter you want to export:

And then scroll down and click on Export:
Your filter will now be downloaded as an XML file. But we’re not quite done yet, it’s time to take that XML file (your filter settings) and apply it to your other Gmail account.
To import your filter to the other account, navigate again to Filters and Blocked Addresses, then scroll down and click on Import filters.
Now upload your XML file.
Next click the checkbox by the imported filter and click Create filters to apply this filter to the Gmail account.
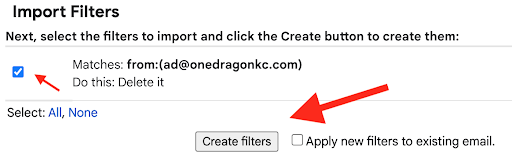
You’re all set — that filter will apply to any new emails on that account.
2. Create Exact Filters Using Operators
Sometimes, the “simplified” filter options just aren’t enough to optimize your inbox. When that’s the case, you can create precise filters using Gmail’s search operators. These operators are essentially just phrases or symbols that you can type into the Gmail search bar and use to create filters manually.
Let’s explore these operators and how to use them to make advanced time-saving filters:
AND
Let’s say you want to search for emails that contain multiple, specific words to create your filter.
For instance, you’d like to find all your emails that contain both the words “CRM” and “Quote.”
Simple enough, just type those words into the search bar with an all caps AND in between them like so: CRM AND Quote.
OR
If you need to find emails that contain one term or another, but not necessarily both, then OR is going to be your best friend. Similarly to the AND operator, you just type your desired words into the search bar with an OR separating them like this: CRM OR Quote.
“”
The double inverted comma operator lets you search for exact phrases, while not being case sensitive. So if you are looking for an obscure phrase, simply type that in surrounded by the commas and it will only display emails with that exact order of words like: “open source software suitable for enterprise”.
+
The plus operator works almost the same as the double comma operator except it’s used to find an exact term instead of a longer phrase. So if you wanted to find emails containing the exact term “enterprise”, you would type: +enterprise.
–
Just as importantly as being able to search for emails containing exact words or phrases is to leave out emails that contain specific things.
That’s where the minus operator comes in. To leave out emails containing “coffee” for example you would simply type: -coffee.
()
The parenthesis operator lets you search for emails that contain all of the selected words but not necessarily in that order. So if you need to find messages that contain both “organic” and “coffee” but not in any particular order, you would input: (organic coffee).
Track emails, email reminders & templates in Gmail for free
Upgrade Gmail with the features it’s missing
Add to GmailDavid Campbell
David Campbell is the editor of the Right Inbox blog. He is passionate about email productivity and getting more done in less time.