![How to Create a Gmail Alias [Step by Step Process]](https://www.rightinbox.com/wp-content/uploads/how-to-create-a-gmail-alias-441x293.jpeg)
Have you ever wished that your email inbox was more organized, or felt that you would be a little more productive if your marketing emails were filtered automatically? That’s where a Gmail alias can help.
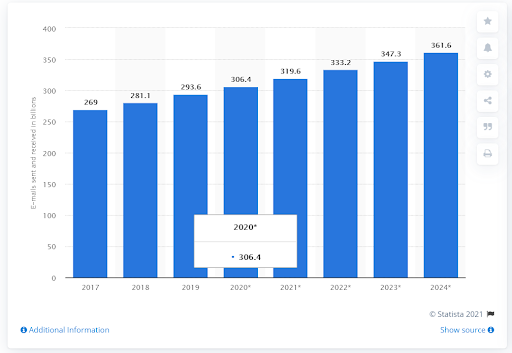
In 2021, the number of emails sent and received worldwide is estimated to be around 320 billion, and that’s expected to rise to 360 billion by the end of 2024.
It’s therefore easy to see how so many of us are becoming overwhelmed by our email inboxes. One solution to this issue is to create Gmail aliases. Right Inbox’s email productivity tool is also another solution but we will get more into that later in the article.
What Is a Gmail Alias?
Your standard email might be firstname.secondname@workplace.com – but that doesn’t have to be your only email. You can set up other emails to be delivered to your inbox that you then filter out automatically to keep your inbox clean.
Read on to get a step by step guide to creating a Gmail alias.
And if you want to learn how to apply filters to these Gmail aliases, you can read our article on how to create filters in Gmail.
What Are the Benefits of Using a Gmail Alias?
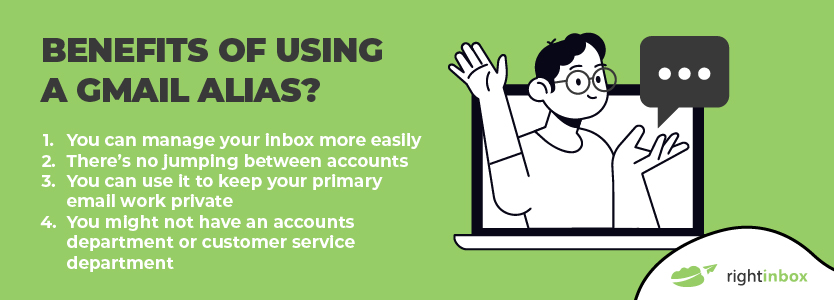
There are many reasons you might want to use a Gmail alias. Here are a few of the most common:
- You can manage your inbox more easily – when everything can be delivered to the same inbox, you can easily set up filters and email automation to make your life easier.
- There’s no jumping between accounts, wasting valuable time.
- You can use it to keep your primary email work private while still getting the emails in your primary inbox. This might be handy if you wanted to sign up for competitors’ email marketing campaigns.
- If you’re a new business, you might not have an accounts department or customer service department. By setting up Gmail aliases, you can have them sent to your main inbox for you to be able to sort them easily.
How to Create a Gmail Alias [Step by Step Process]
So how do you go about creating a Gmail alias? It’s not as hard as you might think. Just follow the following steps:
Note: before you do this, you need to create a Gmail account that you will use as an alias. The process for doing so is the same as setting up any Gmail account.
Step 1. Head over to Gmail and click Create Account.
Step 2. You should see a sign-up form. Fill in the details for the alias that you want to send emails to your inbox.
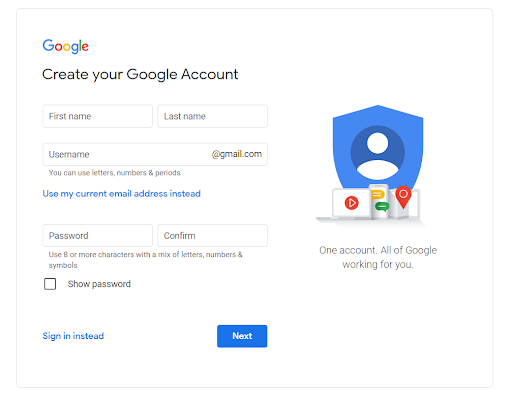
Step 3. Enter your phone number for verification.
Step 4. You’ll now receive a message from Google with your code. Enter that.
Step 5. It will then ask for a few more details. Enter those. Check the Privacy and Terms. Click Agree.
Bringing that Alias into your Main Gmail Inbox.
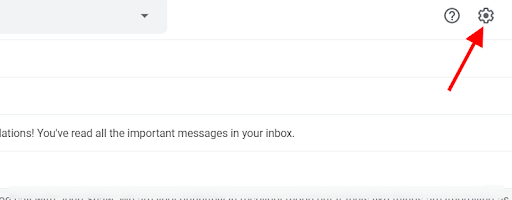
Step 1. Log into your Gmail account on your desktop.
Step 2. Click on the Gear icon in the top right-hand corner.
Step 3. From the drop-down, you need to choose See all settings.
Step 4. Find Accounts in the top ribbon and click that.
![]()
![]()
Step 5. Scroll down to find Check email from other accounts.
![]()
![]()
Step 6. Click Add an email account.
Step 7. You should see a pop up appear. It will ask you to enter the email address that you would like to add.
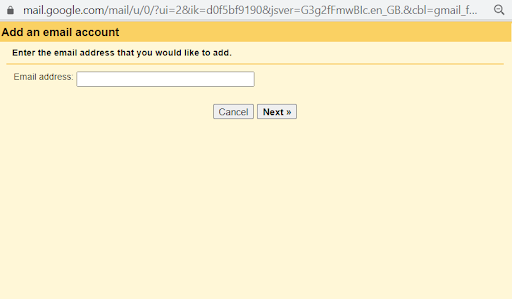
Step 8. Add it in.
Step 9. Then add your password.

Step 10. Always use a secure connection should already be ticked for you. Leave that ticked.
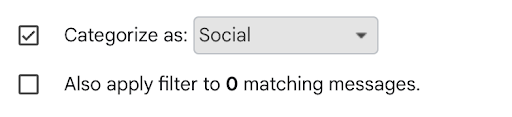
Step 11. It’s always easier to set up the labeling at this time so that all emails are organized for you.
![]()
![]()
Step 12. From there, Google will guide you through the verification process, and you will have the alias coming into your inbox
And that’s how you create an alias and how to bring it into your main Gmail inbox.
How To Create A Temporary Alias In Gmail
To create a temporary alias, you can simply add a plus at the end of the first part of your gmail address.
Step 1. To actually add the temporary alias, go to the top and click on the options icon by the search bar.
Step 2. In the to field, put your alias in, then click create filter.

Step 3. On the next page, choose the category that you want emails going to that alias to be applied. Then click create filter again.
Step 4. Now, emails matching that temporary alias will go to your designated inbox area.
Create a Gmail Alias FAQ (Frequently Asked Questions)
What is a Gmail Alias?
A Gmail alias is a secondary email address that you use to receive emails instead of going to your primary inbox. You can create a permanent or a temporary Gmail alias using the article above.
What’s The Use Of A Gmail Alias?
A Gmail alias allows you to avoid using multiple Gmail accounts in order to organize your inbox. Using one email account, you can force emails from certain senders or with certain keywords to go to a separate label or category.
This keeps your inbox clean and free of clutter.
How Do You Create A Gmail Alias?
There are two ways to create a Gmail alias. The first is to create a permanent alias.
This allows you to connect another email account with your Gmail account. Secondly, you can get a temporary alias.
This uses your same Gmail account while simply adding a plus to the end of it. It can be easier because you don’t have to verify and connect an alternate account.
Is It Safe To Create A Gmail Alias?
Yes. As long as you are following proper security guidelines with your Gmail and other potential connected accounts, it’s perfectly safe to create a Gmail alias. All it does is allow you to send or receive email via the alias account from your primary account.
Track emails, email reminders & templates in Gmail for free
Upgrade Gmail with the features it’s missing
Add to GmailDavid Campbell
David Campbell is the editor of the Right Inbox blog. He is passionate about email productivity and getting more done in less time.