With email set to hit 4.37 billion users worldwide in 2024, doubling down on email encryption is more important than ever — unless you want to risk data leaks or hackers stealing your data.
But how do you even get started with email encryption? And don’t you need programming skills to do it? No, you don’t. And now that’s clear, let’s learn how to encrypt your email without needing to work up some programming magic.
What does Email Encryption mean?
Email encryption means encrypting or disguising the content of email messages to prevent them from being read by an unauthorized or unintended person. It makes the content of your emails unreadable as they travel from your inbox to another.
So, even if a hacker intercepts your messages, they won’t be able to understand the content or access your email.
How Email Encryption Works
Two protocols are used for encrypting emails: TLS and end-to-end email encryption. Transport Layer Security (TLS) encryption stops emails from being read during transit. But it doesn’t protect your emails from cybercriminals after they’ve been received, which reduces its effectiveness.
In contrast, end-to-end email encryption relies on a public key infrastructure (PKR), which is a combination of a private and a public key. You’ll use the public key to encrypt your email, and the recipient of your email will use the private key to decrypt it into a readable format.
An encrypted message has to be decrypted by a unique private key to make it readable. If you don’t have a private key, you won’t be able to open it.
Types of End-to-end Email Encryption
You can use two methods to implement end-to-end encryption:
1. Secure Multipurpose Internet Mail Extension (S/MIME)
S/MIME is an email encryption protocol organizations use to increase email security and prevent data leaks. It digitally signs and encrypts an email to make sure it’s authenticated and protected from cyber threats.
The protocol uses a two-key system (public and private), also known as asymmetric encryption, to encrypt and decrypt an email. However, you need to install a S/MIME certificate on the email clients of your and your recipient’s computers.
Once that’s done, every email you send will be encrypted using your public key, and the recipient will decrypt the email using the private key. This way, S/MIME protects you from identity theft, email tampering, phishing and spoofing, and other cyber threats.
2. Pretty Good Privacy (PGP)
Pretty Good Privacy (PGP) is a program that enhances email security and authenticates email messages using file encryption and digital signatures. It uses the public key system to encrypt emails, where every user has a unique public key and a private key.
When you send an email using your public key, your recipient uses a private key to open it. Here’s how the process works:
- PGP generates a one-time public encryption key using an unbreakable algorithm for a random email session.
- The session gets encrypted using the message sender’s public key, protecting the email during transmission. The sender can share this key with anyone they want to communicate with.
- The recipient decrypts the message using their private key once they receive it.
How to Encrypt Emails in Popular Email Systems
Now that you know the different ways to encrypt messages, let’s learn how to protect your emails in popular email systems:
1. Gmail
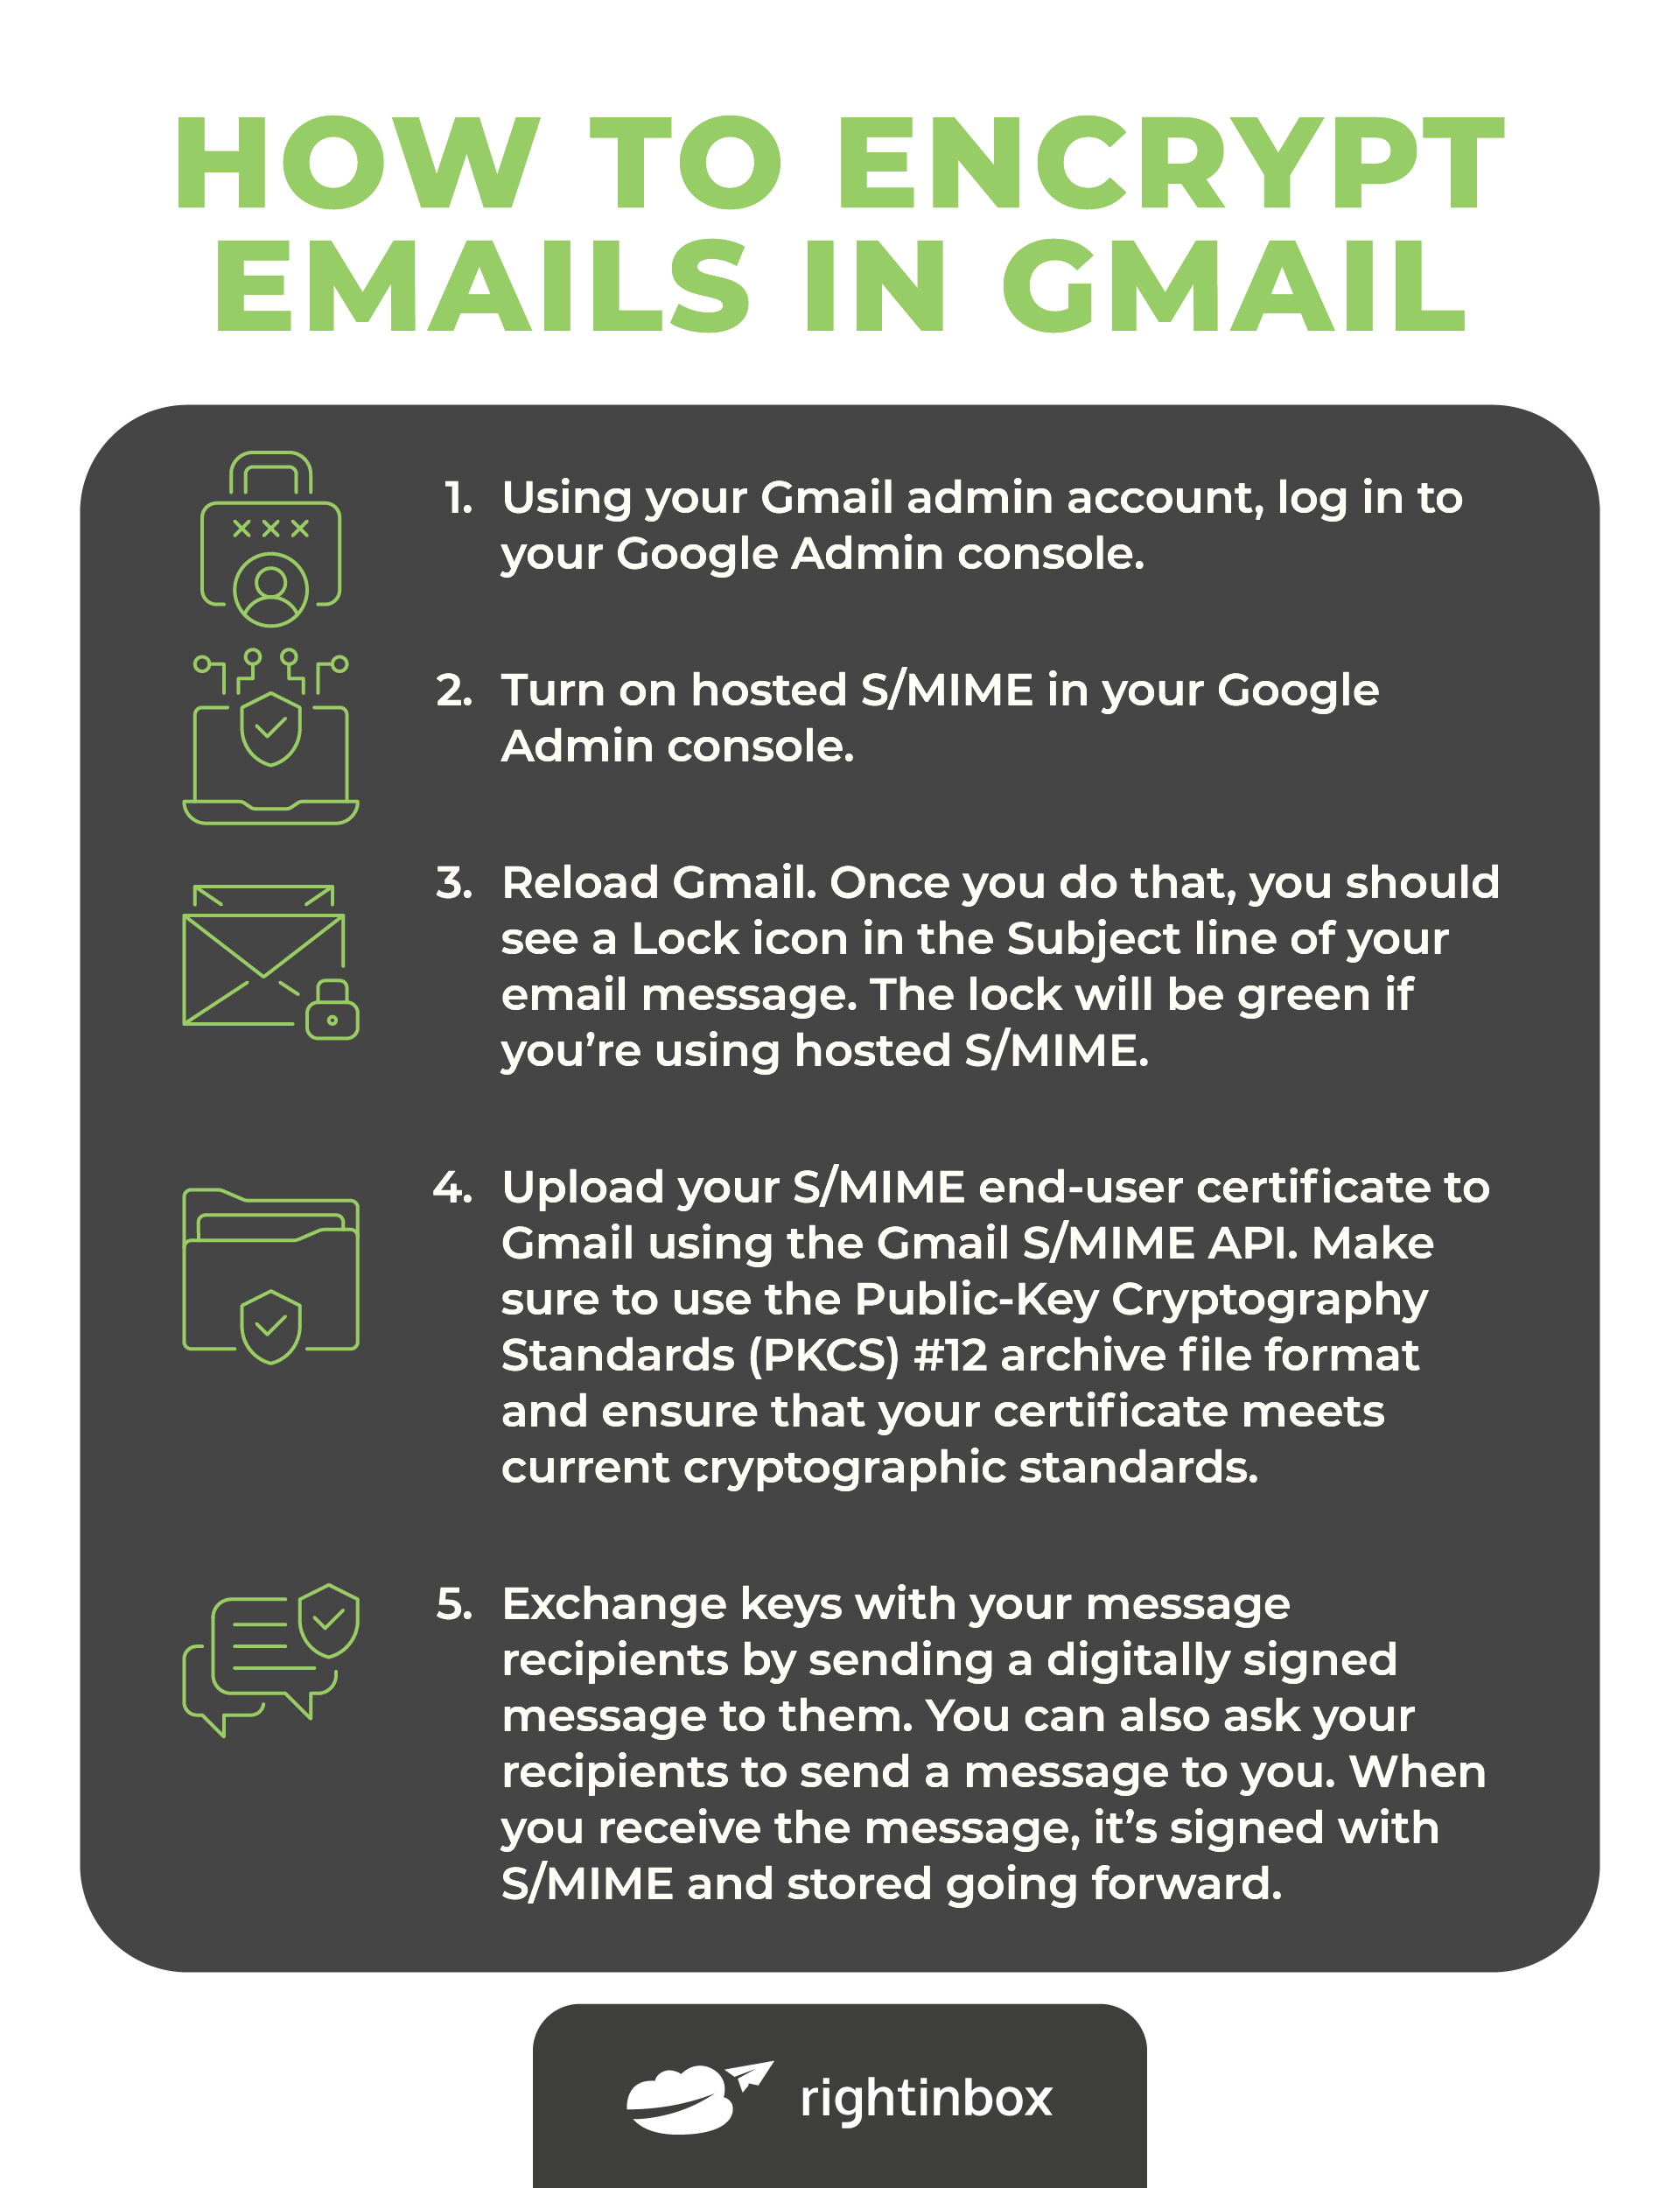
If you want to use enhanced encryption, you and the person you’re communicating with need to enable S/MIME. However, it’s only available with Google Enterprise or Education accounts. Here’s how to set it up:
- Using your Gmail admin account, log in to your Google Admin console.
- Turn on hosted S/MIME in your Google Admin console.
- Reload Gmail. Once you do that, you should see a Lock icon in the Subject line of your email message. The lock will be green if you’re using hosted S/MIME.
- Upload your S/MIME end-user certificate to Gmail using the Gmail S/MIME API. Make sure to use the Public-Key Cryptography Standards (PKCS) #12 archive file format and ensure that your certificate meets current cryptographic standards.
- Exchange keys with your message recipients by sending a digitally signed message to them. You can also ask your recipients to send a message to you. When you receive the message, it’s signed with S/MIME and stored going forward.
2. Outlook
If you’re looking to encrypt an email in Outlook, you can do it using two encryption options: S/MIME and Microsoft 365 Message Encryption, for which you need an Office 365 Enterprise E3 license.
Here’s how you can enable S/MIME on Outlook:
- Install a S/MIME certificate on your computer.
- Open Outlook, navigate to the File menu, and select Options. Click the Trust Center and go to Trust Center Settings.
- Choose Email Security.
- Click Encrypted email and navigate to Settings.
- Find Certificates and Algorithms, click Choose, and select S/MIME certificate.
- Choose OK.
- Compose an email and choose Send.
If you have a Microsoft 365 subscription, you should follow this process:
- Draft an email message.
- Now navigate to Options, click on Encrypt, and choose from these options: Encrypt-Only, Do Not Forward, Confidential/All Employees, Contoso-Customer Ready, or Highly Confidential/All Employees.
- Send your message.
Aside from the above encryption methods, Outlook also gives you the chance to encrypt a single message. Here’s how to do it:
- Once you’ve drafted a message, you should click File and navigate to Properties.
- Now choose Security Settings and check the Encrypt message contents and attachments box.
- Send your message.
3. Yahoo
If you love using Yahoo! Mail and know it doesn’t support email encryption, don’t despair. You can use a web browser extension like Mailvelope to encrypt emails. Here’s how to do it:
- Open Google Chrome, Mozilla Firefox, or Microsoft Edge because the extension works perfectly on these browsers.
- Install the Mailvelope extension.
- Log in to your Yahoo! Mail and click Compose on the page’s top-left corner.
- Click the Mailvelope icon in the top-right corner of your message draft. A small window will pop up.
- Enter your recipient’s email address into the Recipient column. It will turn green if they have an active key stored in the Mailvelope server.
- Now create a digital signature for your email. To do that, click Options at the bottom-left corner of the Mailvelope window, hit the Send message label, and select your Key ID.
- Click Encrypt. A new window will pop up.
- Enter the password you’ve created for your account’s Key ID and click OK.
4. Apple Mail
If you’re looking to send encrypted email messages in Apple Mail, you need to install a S/MIME certificate on your keychain. Once you’ve done that, here’s the process going forward:
- Open the Settings app.
- Click on Mail and navigate to Accounts.
- Choose the account with messages you want to encrypt.
- Select Account, go to Advanced, then Encrypt by Default, and turn it on. You’ll see an open lock symbol on the upper-right side of the email window. Clicking on it means your email is encrypted.
Best Practices for Email Encryption
When it comes to email encryption, you can never be too careful. So, always check these best practices off the list when scrambling your emails:

1. Use Two-factor Authentication (2FA)
You may think you only need two-factor authentication for your paid accounts. But it can be a lifesaver when a cybercriminal manages to guess your password and sneaks into your account.
So, always set up a 2FA code when using email for work or even personal purposes.
2. Create a Strong Password and Frequently Change It
Too many people use passwords like “password” or “12345.” Yes, you can easily remember them, but these passwords are a hazard because they increase the likelihood of someone breaching your account.
To make sure that doesn’t happen, use upper and lower case letters, numbers, special characters, and phrases in your passwords.
3. Don’t Check Your Email Using Public Wi-Fi
Public Wi-Fi is notoriously unsafe. To make sure hackers don’t get direct access to your company’s files, never access emails in an internet cafe or an Airbnb.
You should also encourage everyone you email to do the same and to use mobile internet when they’re out of the office and working on sensitive files.
How to Decrypt Encrypted Emails
Now that we’ve covered how to encrypt emails, let’s find out how you can open and read them:
1. Gmail
If you’re looking to open an encrypted email in Gmail, here’s what to do:
- Log in to your Gmail account.
- Select the encrypted email.
- Click on the Show message option.
- Enter the key shared by the message sender in the pop-up window. It’s the only way to read the email message.
If you don’t have a key, ask the message sender for one.
2. Outlook
If you want to open a protected email message sent to your Microsoft 365 account or Outlook on the web, here’s what to do:
- Log in to your Outlook account.
- Select the protected email. You’ll see a banner at the top of the messages indicating any message protection.
- Click on the Click here to read your message option.
But if an Outlook message is sent to your Gmail account, here’s what you can do:
- Click on the email and select Click here to read your message.
- Select Sign in with Google in the pop-up window.
- Choose Allow after you sign in. You’ll be able to see the message in another window.
3. Yahoo
If you’re wondering how to decrypt emails with Mailvelope, here’s how to do it:
- Log in to your Yahoo! Mail account.
- Click on the email you received.
- Select the Show message label. A window will pop up.
- Type your key password in the window and click OK.
- Read your email message.
4. Apple Mail
To decrypt protected emails in Apple Mail, you should follow this process:
- Log in to Apple Mail.
- Compose a message.
- Click on the lock symbol on the upper-right side of the email window. If it’s closed, open it to decrypt your email. You can also reverse the encryption process by unchecking the Encrypt by Default option.
How to Send and Receive Encrypted Emails
If you’re wondering how to send and receive encrypted emails on your favorite email systems, here are some pointers for you:
1. Gmail
To send and receive encrypted emails in Gmail:
- Log in to your Gmail account.
- Compose a message. Make sure your digital signature is correct.
- Send the email.
To ensure you receive encrypted emails in Gmail, ask the message sender to share a digitally signed message with you. It’ll be signed with S/MIME and enable you to email them freely.
2. Outlook
There are two ways you can send and receive encrypted messages on Outlook:
- Your network administrator will create rules that automatically encrypt messages. If your message meets these rules, it’ll be encrypted before you send it.
- If your message doesn’t meet your admin’s rules, you can click on the Protect button in Outlook on the web to encrypt your message.
3. Yahoo
If you’re wondering how to send and receive protected email messages with Mailvelope, here’s how to do it:
- Log in to your Yahoo! Mail account and click Compose on the page’s top-left corner.
- Click the Mailvelope icon in the top-right corner of your message draft. A small window will pop up.
- Enter your recipient’s email address into the Recipient column.
- Type your message.
- Enter the password you’ve created for your account’s Key ID.
- Click Send.
4. Apple Mail
If your recipient is a user in your company (in the same Exchange environment), iOS will retrieve the necessary certificates from the GAL to help your recipient decrypt the email.
But if they aren’t in your company, you can use these steps to install the recipient’s certificate on your device before emailing them:
- Find a message from your intended recipient and tap their address. If there is a red question mark to the right of their address, they’re untrusted. You can validate their address by manually installing the certificate for their email.
- Click View Certificate.
- Choose Install to download and validate the recipient’s certificate.
- Tap Done to complete the process.
Frequently Asked Questions About Email Encryption
Is it a good idea to encrypt your email?
Yes, it’s a good idea to encrypt your emails because it can reduce the chances of cybercriminals gaining access to your personal information or your company’s sensitive data and causing data leaks or breaches that cost thousands of dollars.
Which encryption is more secure?
End-to-end encryption is the most secure form of email encryption you can get. It ensures your emails are secured while you’re typing them, while they’re being delivered, and when they’re being viewed by a validated receiver.
These emails can’t be read even by email servers, which makes it near impossible for cybercriminals to gain access to your personal data.
Can an encrypted email be hacked?
No, hackers can’t gain access to encrypted emails because they’re unreadable until an encryption key is used to decrypt them. However, if they gain access to the key, they may be able to crack the encryption and access your personal data.
Who can see encrypted emails?
Since encryption scrambles the content in your emails beyond comprehension, only the people with whom you’ve shared the private key can see your message.
Should I encrypt every email?
Whether or not you should encrypt every email depends on their nature. But keep in mind that encrypting your email messages can keep your personal information away from almost all cybercriminals. And not having it could leave your data vulnerable to cyberattacks like phishing, data leaks, and breaches.
Track emails, email reminders & templates in Gmail for free
Upgrade Gmail with the features it’s missing
Add to GmailDavid Campbell
David Campbell is the editor of the Right Inbox blog. He is passionate about email productivity and getting more done in less time.