
If you work online or via email to any capacity, you’ve likely acquired a few email addresses over time.
It can be a pain to switch back and forth between various personal and professional emails, but it seems necessary compared to the alternative of missing an important message.
Luckily, you can send and receive emails from various email addresses all in a single Gmail account with merging. Let’s talk about how to save time and hassle by merging your Gmail accounts quickly and easily.
Why Merging Gmail Accounts Saves Time
There are many reasons for merging your Gmail accounts – here are some of the most common:
- It allows you to flip between personal email accounts if you have more than one.
- It’s becoming more and more common for office workers to have more than one email, whether for different departments or for different language communications. Merging all of these helps you stay on top of all of your business communication.
- Merging email accounts (whether personal or business) allows for quick movement between all of your inboxes. No more logging in and out of each email account.
How to Create Multiple Accounts in One Gmail Inbox
Step 1. Firstly, make sure that you’re logged into a Gmail account.
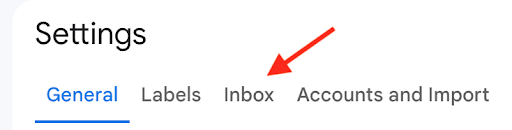
Step 2. You then need to locate the gear icon and then click Settings.
Step 3. Once you’ve done this, you need to find the Accounts setting from the top ribbon menu.
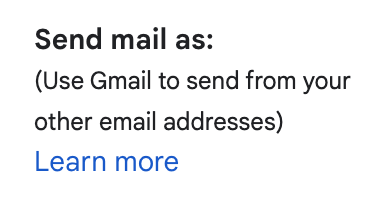
Step 4. Look a little way down the page and select Add another email, followed by Send mail as.
Step 5. Once you’ve done this, you will get a little popup. It will ask you for your full name and the address of the second email address. Add these details in.
Step 6. Then, click the Treat as an alias button. If you want to receive and send emails from the secondary email that you have just added, you need to ensure this is ticked.
Step 7. If you want replies to messages that you send to go to this inbox, you need to click Specify a different reply-to address. You can do this by clicking the link.
Step 8. When you’ve finished this, press the Next Step button.
Step 9. You now need to send verification to your secondary email address. Click the button that you see and it will send the confirmation email.
Step 10. Head over to the secondary email that you’ve just added the details for. You should find that you have a confirmation email.
Step 11. The quickest way to verify it is to click on the link that is in that email. Alternatively, you can copy and paste the code into the popup field.
Step 12. In your secondary email account, you now need to set up the POP and IMAP settings. These basically let the secondary account send and receive emails.
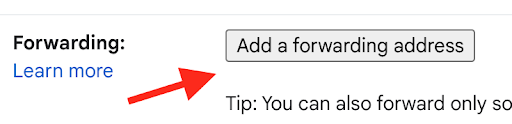
Step 13. In the secondary account, click the gear icon followed by Forwarding and POP/IMAP from the main navigation.

Step 14. Navigate to the Forwarding section and then click Add a forwarding address.
Step 15. You’ll now see a popup. Add the primary email to that section.
Step 16. Click proceed, and then you’ll get an email confirmation in your primary email.
Step 17. Head back over to your primary email account and open the confirmation email that you should’ve received.
Step 18. Click on the link in the email or copy and paste the code and add it to the field in the Forwarding section of the secondary account. We suggest just clicking the link – it’s much quicker.
Step 19. In the secondary account, you should now see an option to Forward a copy of incoming mail to… Click the dropdown and choose how you want the email to behave.
Step 20. While it might sound complicated, it’s actually really easy and quick to set up. You’ve now got all the emails from your secondary account being forwarded to your primary account. No more switching.
Additional Reading: 25 Best Gmail Extensions for 2021
Using Multiple Inboxes in Gmail
As well as having the ability to merge your email accounts in Gmail, you also have the option of having multiple inboxes. Think of it as having separate folders but for your inbox.
While this isn’t the same as merging, it can help you keep everything in check and organized.
Here’s how to set that up.
Step 1. Make sure that you’re logged into your primary email account in Gmail.
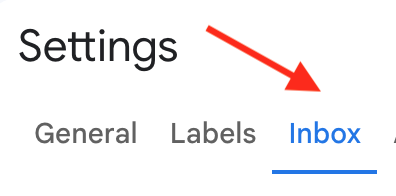
Step 2. Locate the gear icon at the top right and then click Settings.
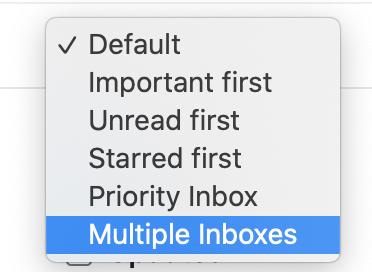
Step 3. You should now see a new menu. In the top navigation ribbon you need to select Inbox.
Step 4. Look for the section called Inbox type. Click the dropdown menu and choose Multiple inboxes.
Step 5. You should be able to see a section called Multiple inbox sections. This is where you will define your rules for your multiple inboxes.
Step 6. First, you need to define your search query. Type in “is:inbox-name” Obviously, you need to change the inbox-name to the name you are using in your inbox.
Step 7. Quick tip: always make sure that these are in lowercase and if there is more than one word, separate them with a dash.
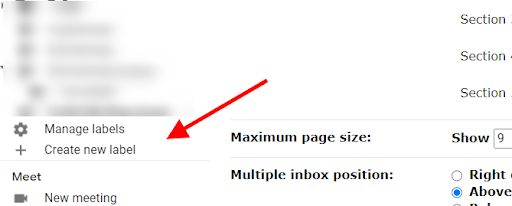
Step 8. You now need to create the labels that will make your multiple inboxes work.
Step 9. On the left-hand side of your Gmail interface, you should see a Create new label option. If you can’t see this, you may need to click the More button.
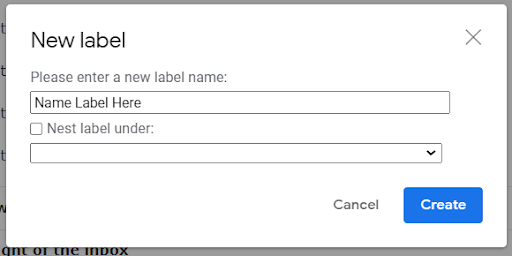
Step 10. What you need to do now is create labels based on the names that you set up in step 6. Add in the name exactly as you typed it in step 6.
Step 11. Click Create.
Step 12. Do this for each of the inboxes that you created in step 6.
Step 13. Now as emails come in, you can assign them to the folder using the labels that you’ve created.
Keeping Your Email in Check with Labels and Filters
While using Gmail labels in conjunction with multiple inboxes is a great way to keep things organized, you can always take it one step further.
How To Create a Gmail Filter Using Gmail’s Search Bar
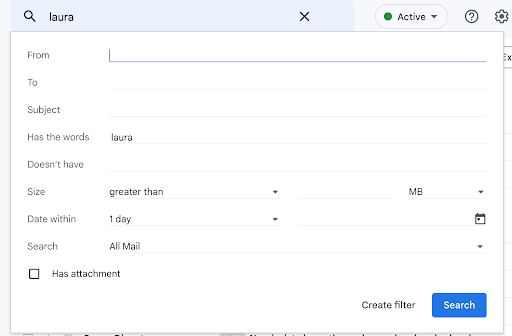
Step 1. First off, you need to find the search bar at the top of the Gmail interface. Type in an email or search query that you want to create a filter for.
Step 2. See the little arrow? Click that to adjust the filter.
Step 3. This will bring up a new menu that allows you to refine the filter as much as you want.
Step 4. Refine the filter and then click the Create Filter button at the bottom.
Step 5. You should now see another menu.
Step 6. From here, select Categorize as, pick a category and select Also apply filter to matching conversations.
Step 7. Click Create filter to confirm.
Conclusion
Digital work is all about being efficient. Is it necessarily “difficult” to switch back and forth between various Gmail accounts during the day? — No. However, you can save yourself the mental strain and more importantly wasted time by simply merging your Gmail accounts into one. So just follow the steps above and win back some “me time.”
Track emails, email reminders & templates in Gmail for free
Upgrade Gmail with the features it’s missing
Add to GmailDavid Campbell
David Campbell is the editor of the Right Inbox blog. He is passionate about email productivity and getting more done in less time.