
When catering to an international audience, timing your emails right becomes tricky. How do you send your messages at a time when you’re audience is up and about instead of snoring in the bed?
Well, Right Inbox offers a simple solution. Our “Send Later” feature allows you to schedule your emails well in advance and cater to time zones all around the world.
In this post, we’ll explore the importance of scheduling emails based on your recipient’s time zone and how to use Right Inbox to do it.
The Importance of Time Zones in Email Communication
23% of all email opens occur within the first hour after delivery. Within the second hour, open rates drop by 50%.
An email sent at noon in NYC reaches Sydney at 2 AM. While your Australian recipient might check their email right after they wake up in the morning, the longer your message waits in their inbox, the less likely it is to be opened.
This is why optimizing emails for different time zones is key for effective marketing—which is all about sending the right message at the right time.
How to Schedule Emails According to Receiptient Time Zones With Right Inbox
Here’s how to use Right Inbox’s “Send Later” feature:
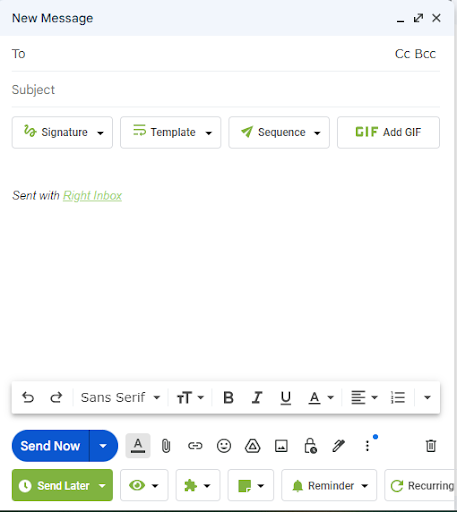
1. Install the Right Inbox browser extension
2. Open your Gmail account and create a new email by clicking on “Compose” in the left-hand menu
3. Write your email as you normally would. Locate the “Send Now” button. You’ll find a “Send Later” button just below it
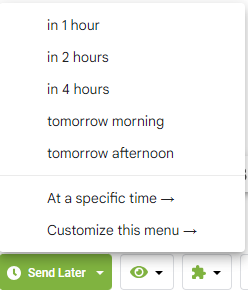
4. Click on “Send Later”. You’ll now see multiple options to choose from:
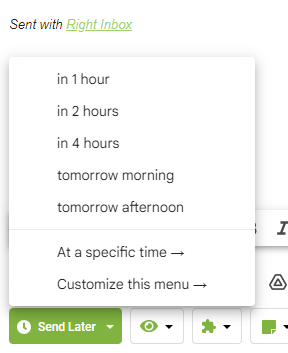
5. Select your preferred time from the list. If you select “tomorrow morning” or “tomorrow afternoon”, you won’t be able to specify an exact time. To set a custom time, click on “At a specific time”
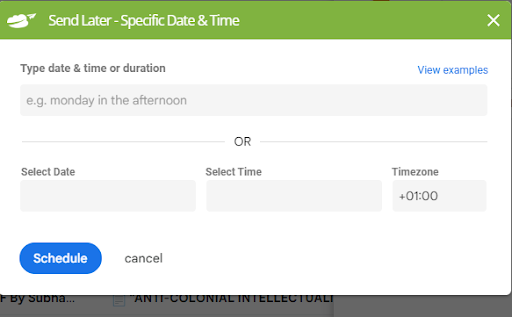
6. Next, choose a date.
7. Now choose a time to send your emails from the drop-down menu:

8. Right Inbox operates from within your local time zone by default. But you can use a timezone option on the right to specify your desired time zone, which will help you choose an appropriate time for sending your message based on where your recipients live.

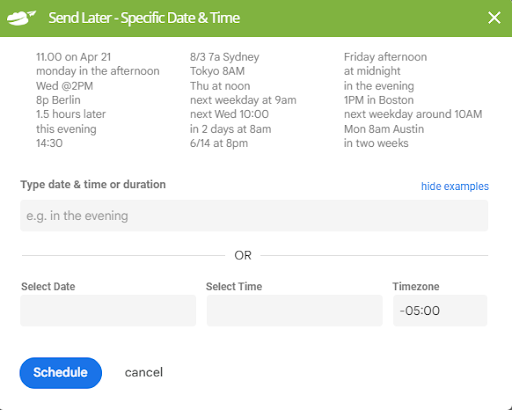
9. You can also input your preferred time and date in your own words—take a look at these examples:
10. When you’re happy with your preferred time, click on “Schedule”. You’ll see a pop-up confirming your scheduling.
Customizing the Scheduling Menu
The scheduling menu offers five default options. But Right Inbox also offers a “Customize Your Menu” option that allows you to add to these defaults.
For instance, if you often schedule emails for “in 5 hours” or “tomorrow night”, you can add these options to your menu for quick access.
Here’s how to do it:
1. Compose an email and click the green “Send Later” option. Click on “Customize this menu” from the menu
2. Click on “Add More”. You can now add custom times to this menu
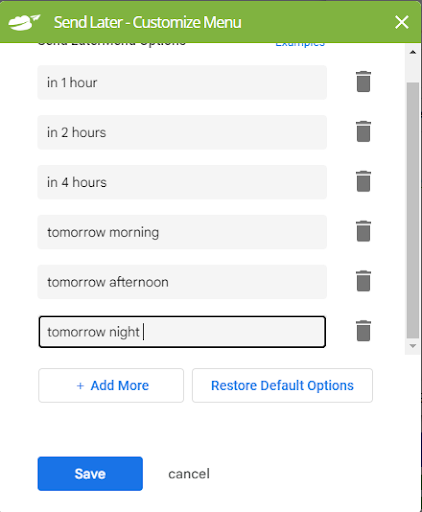
3. Click “Save”. The new menu will reflect your added/deleted times. If you wish to undo your changes, click on “Restore Default Options”.
Track emails, email reminders & templates in Gmail for free
Upgrade Gmail with the features it’s missing
Add to GmailDavid Campbell
David Campbell is the editor of the Right Inbox blog. He is passionate about email productivity and getting more done in less time.