If you’ve recently made the switch to Gmail, then you’ll be joining another 1.5 billion users. Not only does Gmail have a built-in spam filtering system, but it offers you a generous 15GB of free storage.
On top of this, it offers a wide variety of time-saving features, letting you automate some emailing tasks, integrate your calendar and contacts, and customize your dashboard to suit your own organizational needs.
So let’s take a look at how to use Gmail step by step on desktop and mobile:
How to Use Gmail on Desktop:
Here are some of the most important features to know in Gmail’s desktop version:
1. Registering & Signing In
Registering your free Gmail account takes no time at all. You just need to provide a first name, last name, an email address (which will end in @gmail.com by default), and a password.
However, if you wish to register your business, charity, or educational organization, you’ll need to set up an account in Google Workspace (formerly G-Suite), starting at $5.
Downloading the App and Signing In/Out Remotely
Because Gmail is an online service, you can sign into it from any device anywhere in the world.
There’s also the option to download the Gmail app for your smartphone or tablet. The app operates in a similar way to the Gmail website, with only a few minor differences.
2. Gmail Settings
Gmail’s Settings dashboard gives you a wide variety of options for managing your layout, security, email forwarding, and all sorts of features that facilitate your day-to-day communications.
You’re also given the choice of Quick Settings which lets you choose your inbox Density, Theme, Inbox Type, and where you want your Reading pane.
3. Composing and Sending an Email
Composing an email in Gmail means clicking on the big, red Compose button to bring up your new message. From here you fill in the To, CC/BCC and Subject fields, followed by your email content.
When typing your email, your spelling and grammar mistakes are highlighted, so you’re prompted to edit your content before sending.
You can also insert hyperlinks by highlighting text and clicking the hyperlink icon at the bottom of the screen. To add attachments, click on the paperclip icon at the bottom and upload the file from your computer (alternatively, you can drag and drop the file).
In addition, you can add images by clicking on the photos icon at the bottom of the email and choosing the image you want to upload from your computer.
4. Organizing Your Inbox
There are a number of ways you can customize your Gmail dashboard to bring order to your day-to-day emailing. Folders, labels, and tabs let you manage where your emails are displayed and stored, while stars and inbox formatting can help you to customize your layout to suit your needs and priorities.
Folders, Labels, and Tabs
In Gmail, your inbox, drafts, outbox, sent mail, and trash are all Folders. These cannot be deleted, customized, or added to.
However, Labels –although similar to folders – don’t work in quite the same way. For example, you can assign a label to more than one email or conversation if it can’t be pigeon-holed into one particular category. Labels in Gmail give you much more flexibility over how you organize and locate your emails and conversations within your inbox.
Tabs are the columns of emails, with Primary, Social and Promotions displaying as standard. You can also go into Settings to disable these and/or enable other tabs (choosing from Updates and Forums).
Prioritizing Your Inbox
By default, your Gmail inbox displays incoming mail in chronological order, with your most recent email displaying at the top.
However, if it suits you better to see your most important emails first, you can change your Inbox Type.
You can choose Important first which predicts which emails are most important and shows them at the top of your list; Unread first, displaying your unread emails at the top; Starred first to display all your starred emails at the top (you can manually “star” emails as they come into your inbox), or Priority inbox where Gmail learns which emails you interact with most and displays them at the top.
5. Deleting and Archiving Emails
Gmail allows you to delete emails, where they’ll be stored in the Trash for 30 days until they’re deleted forever.
However, to avoid accidental loss of messages, you can also choose to Archive emails where they will be hidden from your inbox, but retrievable by searching through All mail.
Marking Emails as Spam
When you receive an unwanted email in your inbox, you can mark it as spam to send it to your spam folder. This also ensures that all future emails from that sender, or similar kinds of emails, will be sent to the spam folder, keeping your inbox clutter-free.
6. Setting Up a Signature and Out-of-Office Responder
Your email signature adds a professional tone to your emails, and Gmail lets you customize your own within Settings. You can add images and links, and change colors and fonts to suit your brand style.
Within Settings you can also add an out-of-office responder. This way, you can alert your contacts of your absence while you’re away, and redirect them to a phone number or another contact for important issues.
7. Adding Contacts
By default, Gmail is linked to a separate “App,” Google Contacts, where all your contacts’ details are stored. You can choose to add full profiles to these contacts, including phone numbers, addresses and job titles, to give Gmail more detail about your connections.
8. Automating Filters
If you’re feeling confident with Gmail, you can move onto the more advanced features like email filtering. Gmail lets you set up filters so that incoming mails are automatically sorted, saving you a great deal of admin time.
For example, you can filter your emails by subject, recipient, files size, and other keywords, and instruct Gmail to do certain things with those mails (e.g. label, archive, set priority), saving you from manually sorting through every single email.
Securing Your Account and Backing up Your Gmail Data
Gmail comes with its own measures for keeping your data and communications secure.
From your Google Account Settings you can set up and change your password, choose a password recovery backup email, check your privacy settings and download your Gmail data.
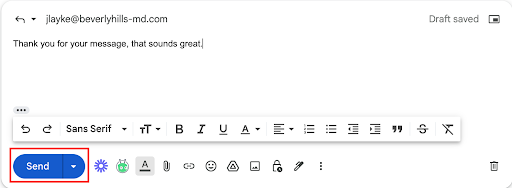
9. How to Respond to an Email in Gmail
Step 1. Log into your email account with Gmail and open the message you’d like to respond to.
Step 2. Click the gray reply arrow.

Step 3. Type the message you’d like to send in the preview pane.
Step 4. Click Send.
10. How to Search for Emails in Gmail
Sometimes just scrolling through the inbox is not an efficient way to search for emails. So if you want to find your emails more quickly, you can use the Gmail search bar at the top of the inbox.
Here’s how to search for emails with the search bar function:
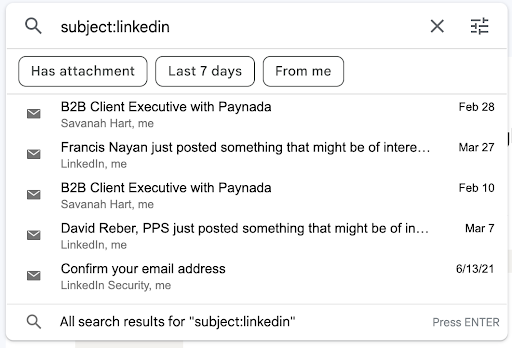
Step 1. Open up your Gmail and type something into the search bar at the top. For instance, you could type in LinkedIn.
Step 2. You’ll see a list of emails below the search bar that match the term you typed in. You can even click on All Search Results at the bottom of the list to see every email that matches that term.
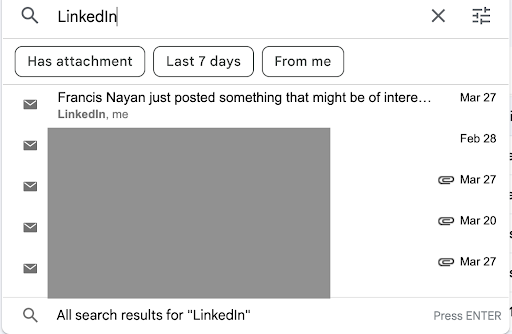
Step 3. Look through the short list of emails to find the right one. Instead of having to scroll through every email in your inbox, you’re left with only the emails using that search term, making the process much faster.
11. How To Search For Emails Using Search Operators
Let’s talk about using operators. Operators are specific terms that you can add to your query to make your results even more specific.
For instance, you can type in “subject:” followed by a name or company. So similar to the previous example, you could type in from LinkedIn.com to specifically see emails that have that as a subject rather than just emails that may contain the word LinkedIn.
12. How to Add Signatures in Gmail
You can add signatures in Gmail with a few simple steps:
Step 1. Go into Gmail and click on the Settings icon.
Step 2. Select See All Settings.
Step 3. Look for the signature category in the general tab and then select Create New.
Step 4. You’ll see a pop-up window. This is where you can name your signature and click Create.
Step 5. Your signature will be visible in the general tab. Now you have the option to create the text or media that you’d like for the signature.
Step 6. Click Save Changes.
How to Use Gmail on Your Mobile Phone
You may find it more convenient to use Gmail on your mobile phone instead of the desktop. Let’s talk about how to use it on both Android or iOS devices.
Android:
Step 1. Go to the Google Play Store and tap Install.
Step 2. Open the app and sign in using your credentials. You’re ready to start using Gmail.
iOS:
Step 1. Go to the Apple Store.
Step 2. Install the Gmail app and open it up.
Step 3. Tap on add another account.
Step 4. Select what type of account you want to add.
Step 5. Follow the instructions to continue adding your account.
And there you have it. You now have Gmail right in the palm of your hand.
How to Add Even More Functionality to Gmail
Gmail is fantastic as a free email service. There are a variety of features and functions that can help you communicate with your friends or business peers easily.
However, if you’re using email professionally, then you probably need some more enhanced and streamlined functionality.
For instance, if you send a lot of emails, if you want to track emails, or if you want to organize your workflow better, Gmail just doesn’t cut it out of the box.
So then what’s the answer? Well, if you already have a Gmail account, you can simply Install Right Inbox from your Chrome browser.
What is Right Inbox?
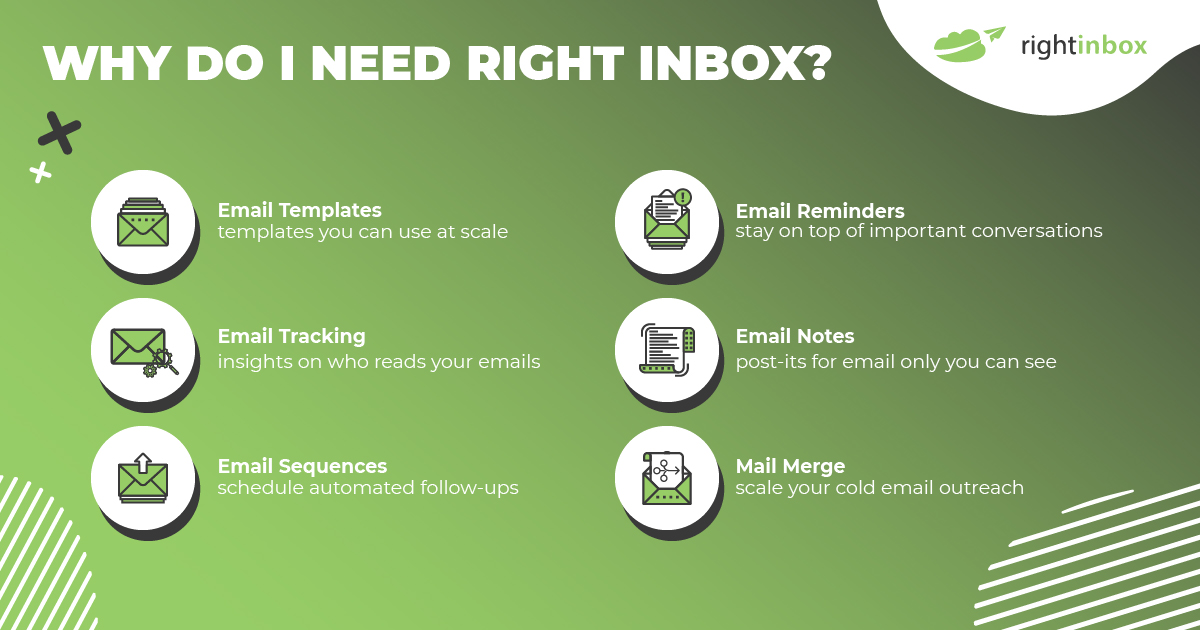
Right Inbox is an app that is free to install and incredibly easy to use. It helps take your Gmail usage to the next level.
With over 12,400 positive Chrome Store reviews, let’s talk about what makes Right Inbox so powerful.
Here are some of the features you should know about:
- Private Notes – Keep private notes so you can organize your inbox, clients, and other messages without them seeing it.
- Sequences – Create sequences and campaigns that trigger after certain actions or time periods. This helps you scale your email management.
- Templates – Stop reinventing the wheel. Create a template one time and then reuse it, changing unique fields or adapting it to a specific circumstance.
- Reminders – Don’t forget about an email. Get reminders for important tasks and follow-ups so that you stay on top of your work without it overwhelming your mind throughout the day.
- Email Tracking – Know exactly who’s opened your email and when. This way you can know if you need to send another email or if it can wait
- Inbox Pause – Email can be overwhelming. Pause your inbox so that you can get work done inside of Gmail without having to filter through all of the distractions throughout the day.
Right Inbox only takes a few seconds to install and begin using. Try it out today and see how your Gmail experience can be easy, fun, and more productive.
In Summary
If you’re new to Gmail, then you’ve chosen a solid service to manage your emails. It has decent storage capacity for a free tool, can be accessed anywhere and on any device (with decent security in place to protect your data and privacy), and has some excellent features to compete with any professional communications suite.
Track emails, email reminders & templates in Gmail for free
Upgrade Gmail with the features it’s missing
Add to GmailDavid Campbell
David Campbell is the editor of the Right Inbox blog. He is passionate about email productivity and getting more done in less time.